Recently, I helped out a friend in need and did a quick run around the supermarket for her. She handed me a Grocery Check List where she'd just ticked off all the items she required. It was so easy to use and on querying her about it, the list is a downloadable pdf from a blog. There's loads of these blogs out there, written by young mums, mostly, trying to get their lives into some sort of order and sharing their ideas with their avid readers.
The Grocery Check List was obviously from a US 'gal' and, while still really handy, didn't quite include the things that I would normally buy. I mean, where was the MightyMite? (I no longer buy Vegemite as it's not an Australian product anymore..)
So, I've developed my own check list. Since I buy very little pre-prepared stuff, it won't suit everyone, but I've left plenty of spaces to add your own items. (I didn't actually add MightyMite, but put in the item 'Spreads', and space to write the particular spread needed.)
I also make my own toiletries washing up liquid and cleaning products, so didn't include those either. Since I don't have babies, there's no nappies, baby food etc. either.
I don't usually buy eggs as I have a friend and a daughter with chooks and we swap eggs for soap.
If you'd like me to create one with these items, let me know what you need and I'll try to fit it in. Tell me what I can take out of the list that you don't normally buy.
I don't buy these items every week, of course, but it's still handy to have the whole list of things that I use.
This link will take you to Google Docs. You can then click 'File' and 'Download' or 'Print'. Let me know what you think, I'd love some feedback. I haven't made it all fancy with pretty pictures, that's just not my thing!
I'm sure there'll be something I've left off the list!
Grocery Check List
(modified 3/7/11)
Friday, June 24, 2011


Thursday, June 16, 2011
Creamy Cauliflower & Brie Soup
This particular soup came about when our outside fridge (beer fridge - but contains a lot of stuff that doesn't fit in the inside fridge) had a little fit and froze everything on the top shelf. A whole cauliflower was frozen solid.
What to do? Cauliflower Soup came to mind. I remember many years ago going to a restaurant where there was a Creamy Cauliflower Soup with Blue Cheese on the menu. So, I thought, "Why not?".
Unfortunately, I didn't have any Blue Cheese and there wasn't any at our local store. I would have liked to use a Blue Castello, a very light 'blue' cheese. Brie was available, so that's what I used.
Creamy Cauliflower & Brie Soup
1 onion
1 Tbsp olive oil
1 whole cauliflower
1 litre milk
2 tsp chicken stock powder
125g Creamy Brie (I use Australian Gold brand)
cracked black pepper
chopped chives, to garnish (wish I had some in the garden)
Saute diced onion in olive oil. Add milk, chopped cauliflower, stock and stock powder. Cook for 20 - 30 minutes. Put into a food processor or blender and puree. Add Brie and seasonings to taste and puree again.
Top with chopped chives to serve.
For Thermomix:
Chop onion on speed 5 for a few seconds. Scrape down and add oil. Saute on 100/speed 2/5 minutes. Add cauliflower, stock, milk and stock powder. Cook on 100/speed 2-3 20 - 30 minutes. Bring up to speed 7 slowly to puree for a few seconds. Add Brie and seasonings to taste, repeat.
What to do? Cauliflower Soup came to mind. I remember many years ago going to a restaurant where there was a Creamy Cauliflower Soup with Blue Cheese on the menu. So, I thought, "Why not?".
Unfortunately, I didn't have any Blue Cheese and there wasn't any at our local store. I would have liked to use a Blue Castello, a very light 'blue' cheese. Brie was available, so that's what I used.
Creamy Cauliflower & Brie Soup
1 onion
1 Tbsp olive oil
1 whole cauliflower
1 litre milk
2 tsp chicken stock powder
125g Creamy Brie (I use Australian Gold brand)
cracked black pepper
chopped chives, to garnish (wish I had some in the garden)
Saute diced onion in olive oil. Add milk, chopped cauliflower, stock and stock powder. Cook for 20 - 30 minutes. Put into a food processor or blender and puree. Add Brie and seasonings to taste and puree again.
Top with chopped chives to serve.
For Thermomix:
Chop onion on speed 5 for a few seconds. Scrape down and add oil. Saute on 100/speed 2/5 minutes. Add cauliflower, stock, milk and stock powder. Cook on 100/speed 2-3 20 - 30 minutes. Bring up to speed 7 slowly to puree for a few seconds. Add Brie and seasonings to taste, repeat.
Wednesday, June 8, 2011
TangZhong Bread

TangZhong is the name of a starter that is used in the making of asian style soft sweet bread. I read about it on this blog and decided to try it out as the consistency of the cooked bread looked so soft and luscious.
I used the Thermomix to make the TangZhong, but you can use a saucepan easily enough. I reduced the sugar to make the loaf less sweet. It had a lovely texture and didn't have that 'yeasty' smell that home made loaves often get after a few days.
Tang Zhong Starter
250ml water
50g bread flour
Place in
 and cook for 5 1/2 minutes/60/speed 4, or cook on stove, stirring constantly until thick and glossy.
Scrape out and place in a bowl on the bench (or fridge if you're in a hot area) to cool to room temperature.
Bread
500g bread flour (Wallaby)
160g TangZhong starter
200g water
2 tsp salt
30g sugar
2 tsp yeast
50g melted cooled butter (I just melt in the microwave)
I also added my 90g of mixed seeds
Place all in
and mix on  for 15 minutes. If you have a breadmaker, let it go through the knead cycle twice. This will give it a fantastic start.
Remove (flour hands so they don't stick to dough) and prove in a warm spot until doubled. Orr you can an allow the dough to prove in the TMX and then do next knead in the TMX as well)
Knead again by hand for a few minutes and then place in bread tin in a warm spot. Cover with a billowed plastic bag. It should rise above the tin.
Bake at 220C for 25 minutes. Remove from tin and bake a further 5 - 10 minutes. Cool on a rack.
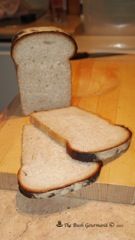
Here's another picture of a much better loaf that I made with this starter after I realised that my yeast was out of date:
Tuesday, June 7, 2011
Apple & Fennel Pork Steaks

I bought some lovely pork steaks in Albany recently which were just too good to bash out to make schnitzels. So, I decided cook them as regular steaks and serve with a creamy apple & fennel sauce.
We all know that apple and pork have a wonderful affinity for each other, but not many people would think of fennel in this mix. I adore the aniseedy deliciousness of fennel seeds and normally will make a cabbage dish with fennel seeds and apple to serve with pork.
This time, a sauce was called for, so the apple and fennel seeds made a delicious debut. I didn't measure everything as I cooked, so amounts are estimates only. Use your own judgement and taste as you go!
Apple & Fennel Pork Steaks
8 pork steaks
1 Tbsp oil
pepper, salt
2 Tbsp butter
1 onion, sliced
1 green apple, sliced (place in a bowl of water with some lemon juice to prevent browning)
1 Tbsp brown sugar
2 tsp fennel seeds
1 cup chicken stock (or water with 2 tsp chicken stock powder)
2 Tbsp Balsamic vinegar
1/2 cup pouring cream (or skinny tinny if you're watching your fat intake)
1 Tbsp or so of cornflour
Heat oil in a large heavy based fry pan. Season pork steaks and cook on both sides for a few minutes on high heat until browned. Remove to a plate and cover with foil.
Heat butter in pan and add onion. Saute for a few minutes and add sliced apple and brown sugar, fennel seeds and balsamic. Saute until softened and caramelised.
Add chicken stock and cover with lid. Cook for 10 minutes or so until very soft. Test for seasoning.
Add cream mixed with cornflour and cook until thickened.
Return steaks and any juices to pan and reheat.
Serve with vegetables in season. I served with french beans, minted matchstick carrot and smashed potatoes.
Saturday, May 28, 2011
Megan's Perfect Pasties

These are the best pasties you'll ever taste!
I am so thrilled to have made these. I adore bakery pasties and recently had a horrible experience of (not) eating a truly awful pastie from the local bakery in town. The pastry was lovely, but the filling was a hard lump of something that tasted rather like cardboard.
For the pastry, make a batch of Rough Puff Pastry, using the method described here. Roll and turn about 6 times and then cut in half and refrigerate for half an hour or so.
If pushed for time, use ready rolled puff pastry. I prefer Pampas 25% Fat Reduced. It works a treat.
To make the filling:
250g lean beef mince
3 carrots
2 onions
1 turnip
½ to 1 parsnip
1 small potato
2 Tbsp rolled oats (soaks up liquid - thanks Judy!)
4 tsp beef stock powder
2 1/2 tsp ground black pepper
a few frozen peas
1 beaten egg for glazing.
I don't
bother peeling the root vegetables. Just chop roughly. Just make sure carrot is cut a little smaller than other vegies as it's harder.
Place mince, stock powder, peas and pepper into a large mixing bowl. Stir together.
To chop vegetables, place into food processor or Thermomix and chop on speed 5 for a couple of seconds at a time. Use the spatula to stir around and chop again if necessary. Add to mince with the remaining ingredients.
To make pasties:
Preheat oven to 200C. Line two trays with baking paper.
Roll out pastry and cut circles using a small side plate (I sometimes make smaller ones using my pie maker cutter). Brush inside with beaten egg and place filling on one half, avoiding edges. Fold other half over and seal with finger crimping. Prick with a fork and place on baking tray.
Brush with beaten egg and bake for half an hour.
Remove from tray and place straight onto oven racks and bake for a further 10 minutes. If using bought puff pastry, there's no need to do this. I just bake until they're cooked and remove to a cake rack to cool.

Filling the pastie

Ready for the egg glaze and baking
I used 3/4 of the pastry and made 10 pasties. The remaining pastry was made into 2 pastie sized apple turnovers, a croissant and some spirals with sugar on top.
Hints and Tips:
I now make snack sized pasties using the larger ring cutter from the electric pie maker - 12 cm diameter. I make 2 lots of pastry and cut into circles, laying each circle on a plate with baking paper in between (keep the baking paper in a plastic bag for next time).
If you make the filling a day or so before, place it in a colander over a bowl in the fridge. Just put a plate on top to stop it drying out. This will allow liquid to drain. Because there's salt in the mixture, it draws liquid from the meat and the vegetables.
My puff pastry making is now perfected and puffs up so much more than previously. Here's a photo of a recent batch.

Sunday, May 22, 2011
Rough Puff Pastry
It's been a while since I've posted here. Skinflint business has been busy and, although I've been doing a lot of cooking still, I haven't had time to blog about it!
Today I wanted to make sausage rolls to put in the men's lunch boxes for seeding. I had a little of the Pampas 25% Fat Reduced Puff Pastry in the freezer, but have had it in my mind to make some Puff Pastry, so that's just what I did.
I've been looking at a recipe on this site for Rough Puff Pastry and I thought that this was the way to go.
I honestly didn't think it would be that great, I'm not a good pastry maker. But, I was in for a pleasant surprise - it was wonderful! Certainly not difficult, maybe a little time consuming, but still not terribly hard to do.
I wanted to use my Thermomix as my hands are way too hot to try to rub in butter without it melting. The key to making great pastry is to have everything really cold. Checking the recipe in the EDC, it appears that you throw everything in to the Thermomix and use the dough setting.
So, that's just what I did (I put iceblocks in the water to chill it) and it turned out to be too much for the poor machine. So I tipped half of it out and just did it in two batches.
Edited some time later to add: I don't know that this makes much sense. Today I made this again and just made two lots, halving the recipe. I've reduced the water from the original recipe as 125ml of water is way too much. I also don't throw it all in at once anymore and have added lemon juice as it helps the pastry to puff.
So, this is the edited version:
Here's the method:
250g flour
250g cold butter, cut into chunks
110ml icy water
squeeze lemon juice
Weigh the flour and butter into the Thermomix bowl or food processor. Chop on speed 4 for around 5 seconds. Add the water and process on speed 4 until it comes together. If there is still a little ice, take speed up to 8 for a second. Tip on to well floured bench or silpat mat and press together, using the mat to bring the mass into a rectangle shape.

Roll pastry out to a long thick rectangle, about 10 x 20, short end facing you. Fold the top 1/3 down and the bottom 1/3 up to meet in the middle. Fold the bottom over the top. This is called a book fold. Wrap in plastic wrap and place in the fridge for 10 to 15 minutes, longer in summer. (Putting it in the freezer is even better)
Place dough onto floured mat. Roll out again to make the rectangle shape, but this time 20 x 30cm.

Roll out again, keep flour on your bench all the time. Try to keep the rectangle shape, push in the edges each time you do the book fold.

Repeat the above step three or four more times (refrigerating between to rest), constantly flouring the bench and the top of the pastry. Rest the pastry after the final roll for at least an hour, preferably overnight.
It should look like this with lots of layers.

When ready to cut shapes from pastry, roll out as evenly as possible, making it about 1mm thick, the same as ready rolled Puff Pastry.
Here's a few things I made with the pastry the very first time I made it. I've since perfected my pastry making and my pastry is a lot puffier these days.


Today I wanted to make sausage rolls to put in the men's lunch boxes for seeding. I had a little of the Pampas 25% Fat Reduced Puff Pastry in the freezer, but have had it in my mind to make some Puff Pastry, so that's just what I did.
I've been looking at a recipe on this site for Rough Puff Pastry and I thought that this was the way to go.
I honestly didn't think it would be that great, I'm not a good pastry maker. But, I was in for a pleasant surprise - it was wonderful! Certainly not difficult, maybe a little time consuming, but still not terribly hard to do.
I wanted to use my Thermomix as my hands are way too hot to try to rub in butter without it melting. The key to making great pastry is to have everything really cold. Checking the recipe in the EDC, it appears that you throw everything in to the Thermomix and use the dough setting.
So, that's just what I did (I put iceblocks in the water to chill it) and it turned out to be too much for the poor machine. So I tipped half of it out and just did it in two batches.
Edited some time later to add: I don't know that this makes much sense. Today I made this again and just made two lots, halving the recipe. I've reduced the water from the original recipe as 125ml of water is way too much. I also don't throw it all in at once anymore and have added lemon juice as it helps the pastry to puff.
So, this is the edited version:
Here's the method:
250g flour
250g cold butter, cut into chunks
110ml icy water
squeeze lemon juice
Weigh the flour and butter into the Thermomix bowl or food processor. Chop on speed 4 for around 5 seconds. Add the water and process on speed 4 until it comes together. If there is still a little ice, take speed up to 8 for a second. Tip on to well floured bench or silpat mat and press together, using the mat to bring the mass into a rectangle shape.

Roll pastry out to a long thick rectangle, about 10 x 20, short end facing you. Fold the top 1/3 down and the bottom 1/3 up to meet in the middle. Fold the bottom over the top. This is called a book fold. Wrap in plastic wrap and place in the fridge for 10 to 15 minutes, longer in summer. (Putting it in the freezer is even better)
Place dough onto floured mat. Roll out again to make the rectangle shape, but this time 20 x 30cm.

Roll out again, keep flour on your bench all the time. Try to keep the rectangle shape, push in the edges each time you do the book fold.

Repeat the above step three or four more times (refrigerating between to rest), constantly flouring the bench and the top of the pastry. Rest the pastry after the final roll for at least an hour, preferably overnight.
It should look like this with lots of layers.

When ready to cut shapes from pastry, roll out as evenly as possible, making it about 1mm thick, the same as ready rolled Puff Pastry.
Here's a few things I made with the pastry the very first time I made it. I've since perfected my pastry making and my pastry is a lot puffier these days.

Wow! Gobsmacked! Just like Puff Pastry!
On returning from the second trip to the farm, I cut the remainder of the piece into rectangles for Cream Matchsticks, my husband's favourite.

Again! Amazing Puff Pastry!
So, since I originally started this in order to make sausage rolls, I thought I'd better do so!
I squished out the filling from 1 packet of the wonderful butcher's sausages I buy from our local store into the Thermomix (a food processor would work). I then added 3 slices of bread, a large squirt of tomato sauce and some herbs from the garden - thyme, parsley and rosemary. Blitz for 30 seconds or so and use for sausage rolls.
I like to shape the filling and lay it on the pastry, so I wet my hands and take a large lump of sausage mine and roll it in my hands.


Bake sausage rolls at 200 for about 15 minutes.

Yum!
Here's my most recent pastry that was used for snack sized pasties:

Wednesday, April 6, 2011
Delicious Mayonnaise, Dijonnaise and Salad Dressings

There is absolutely no need to buy mayonnaise or salad dressings. Sure, the Thermomix makes mayonnaise making easy, but anyone can make it in a food processor too!
I make two sorts of mayo; one is a cooked one and the other a raw egg one. I only ever make the raw egg one when I have access to fresh farm eggs. I have a friend who regularly supplies me with happy chook's eggs and I exchange the kindness with soap. (Thanks Michaela) This time, I'll give her a jar of homemade mayonnaise.
Egg Mayonnaise
2 large whole eggs, separated
1 Tbsp of Dijon Mustard
2 Tbsp White Balsamic Vinegar (or plain white, or lemon juice)
2 tsp honey ( I use Jarrah)
salt & pepper (white) to taste
250ml sunflower oil
Place yolks, salt and pepper, honey, mustard and vinegar in processor or Thermomix bowl. Mix on speed 4 for 30 seconds or so.
Scrape down.
With blades rotating on speed 4, MC in place, slowly pour oil onto lid of Thermomix. If using a food processor, slowly pour oil through spout while processor is working.
Add oil steadily over a period of about 5 minutes.
Once thickened, taste test for seasoning etc. and add egg whites, mixing for 10 seconds on speed 4.
Add 1/4 tsp of Vitamin C powder to help preserve, if desired. Store in jars in the refrigerator.
I make double this recipe. I like to make a variety of dressings with this one mayonnaise.
1. Add yoghurt and chopped mint to make a potato salad dressing.
2. Add lemon juice for a Waldorf salad dressing.
3. Add wholegrain mustard and Special Salad Dressing for Dijonnaise.
4. Add anchovies for a Caeser salad dressing.
5. Add some mayonnaise to a creamy chicken casserole sauce for that tangy zing.
The possibilities are endless.
My cooked mayonnaise recipe can be found here. This is a sweeter mayonnaise and can be used in the following ways:
1. For tasty Tartare Sauce - add chopped capers and gherkins
2. Coleslaw Dressing - add some of the juice from canned pineapple. Add the chopped pineapple to the coleslaw.
3. Use as a potato salad dressing as is.
4. Mix with Special Salad Dressing, 2 tsp curry powder, 1 tsp dry mustard powder to make a Curried Pasta Salad Dressing.
Special Salad Dressing
This is a dressing I've developed over the years. It's similar to my Lemon & Mustard Dressing, with a few tweaks.
1/2 cup lemon juice & lemon zest
1/4 cup white vinegar
3/4 cup sunflower oil
3 tsp Jarrah honey (to taste)
2 tsp dulse flakes
2 tsp seeded mustard
1/2 tsp lemon herb seasoning
1/4 tsp onion powder
1 tsp lecithin
1/4 tsp turmeric
salt & white pepper
Blend together and place in a jar or bottle. The turmeric is optional, but I like the yellow colour. The dulse flakes are a dried sea vegetable and add both flavour and nutrition, but are low in sodium.
I throw this dressing into a whole variety of dishes to add flavour and tanginess.
Subscribe to:
Posts (Atom)