Often when I'm cooking or looking at recipes I am reminded of my mother. Mum was a passionate foodie and a brilliant cook. Quite an achievement, given her background.
My mother was born into a privileged household in Victoria and didn't ever learn to cook since there was household staff to undertake such menial tasks.
She learned the hard way in some dreadfully dingy kitchens over the years that my father was a stock agent for Elders. They lived in some appalling houses on the outskirts of towns in WA.
Mum was an avid recipe collector, she had masses of recipes from magazines and newspapers, but, unlike me, she actually tried every one of those recipes!
One of the things I most remember is how Mum would re-create a restaurant meal that she'd recently had. It's something I continue to do now, as a restaurant meal is a rare treat.
Often when I cook I think of my mum and how she has influenced my love of cooking and food.
Thanks Mum!!
Here's one of the recipes that she found in the Women's Weekly many years ago when they used to have little lift out recipe booklets. I usually start this one the night before I want to bake it:
Pineapple Fruit Cake
1 can crushed pineapple
125g butter
350g mixed fruit
1/4 cup brown sugar
2 tsp mixed spice
1/4 cup sherry
1 tsp bi-carb soda
Place all ingredients, including juice from can into a large saucepan. Bring to boil and simmer 3 minutes. Turn off heat and place lid on pan. Allow to cool completely.
Preheat oven to 165 degrees C and grease and line base and sides of a 30cm square cake tin.
Stir into cooled mixture:
2 beaten eggs
1 cup self raising flour
1 cup plain flour.
Decorate with blanched almonds and bake 1 1/4 hours.
You can add nuts if desired. This cake keeps very well.
Sunday, January 31, 2010
Friday, January 29, 2010
Lemon & Mustard Salad Dressing
This is definitely a favourite in our house. I never buy French or Italian Dressing any more, they just pale in comparison to the flavour in this one. The usual ratio for vinaigrette is 3 parts oil to 1 part vinegar, but I find this just too much oil. I use 1:2 of lemon juice and oil.
Lemon & Mustard Dressing
½ cup lemon juice
1 cup flavourless oil - grapeseed or rice bran
2 tsp wholegrain mustard
2 Tbsp sweet chilli sauce
1 Tbsp honey
Place all in a jar and shake well. Adjust flavourings to your own taste.
Uses
Lemon & Mustard Dressing
½ cup lemon juice
1 cup flavourless oil - grapeseed or rice bran
2 tsp wholegrain mustard
2 Tbsp sweet chilli sauce
1 Tbsp honey
Place all in a jar and shake well. Adjust flavourings to your own taste.
Uses
- Marinade sliced champignons for a few hours, then pour over a lettuce salad just before serving.
- Mix with mayonnaise and coleslaw dressing
- Mix with sour cream or yoghurt
Delicious Rissoles
Rissoles are a pretty basic thing to make and I have never used a recipe in my life, but faced with only a tray of mince in the freezer, I went to my heaving bookshelf (full of cookbooks) and found a Women's Weekly book all about mince!
The very first recipe was for Rissoles, so I thought, what the heck, I'll use this recipe. It was unusual in that the bacon and onion are cooked before adding to the mixture. I've used bacon previously in rissoles and have found that it turns them pink, making them appear uncooked.
But the cooking made all the difference and definitely added to the flavour.
I didn't have enough beef mince (I like to make double quantity as they are great cold), so added pork mince to the mix and felt that this then needed sage and apple, so here's the tweaked recipe:
Tasty Rissoles
500g beef mince
500g pork mince
3 rashers bacon, finely diced
1 onion, finely diced
1 green apple, finely diced
2 cups fresh breadcrumbs
1/2 cup chopped parsley
6 large sage leaves, or 1 tsp dried sage
2 eggs
2 Tbsp worcestershire sauce
4 Tbsp barbecue sauce
fresh ground black pepper
Blitz breadcrumbs and herbs in the Thermomix or food processor. Sauté bacon and onion in a little butter or oil until golden. Add apple and sauté for a few minutes. Allow to cool a little before adding to the rest of the ingredients. Form into patties and refrigerate until ready to cook.
Fry in oil until well browned on both sides.
I would have posted a photo, but they're all gone!!
Thursday, January 28, 2010
Spelt Tortillas
Today I wanted to have wraps for lunch and the local store didn't have any in stock. So, what to do? Make my own...
I did a search of my favourite site www.forumthermomix.com and found that Jo, a member who has a fabulous blog called Quirky Cooking has a recipe for Spelt Tortillas. Having just received my order of Spelt Flour from All About Bread, this was a perfect opportunity to try her recipe.
Jo's Spelt Tortillas
1. Mix together in food processor or Thermomix until blended:
- 2 cups (300g) spelt flour
- 1 t sea salt
- 2 t baking powder (optional, but I think they're nicer with)
2. Add and process until completely mixed:
- 2 Tablespoons butter
3. With processor/Thermomix running on medium speed (Thermomix speed 6), add water in a slow stream, until dough forms a soft ball. Let it process on med. speed for about 5 seconds more.
- approx. 1/2 cup water (I used almost a cup to get the right consistency)
4. Poke dough with your finger - it shouldn't be overly sticky, but it should be nice and soft and stretchy - if it's too hard, the tortillas will be thick and tough. (And if it's too sticky they'll be hard to roll.) Add more flour or water if you need to.
5. Heat up your pan - you can use an electric frypan, or a large iron skillet or non-stick frypan. It needs to be quite hot - between hot and medium hot. After you've cooked one you'll know whether it needs to be turned up or down. Don't put any oil in the pan.
6. While the pan's heating up, flour the table/counter and pinch off a ball of dough, Squish it into the flour, coating both sides, then roll out with rolling pin, flipping it over back and forth to keep it from sticking. (You'll use quite a bit of flour for rolling them out.) Don't worry if they're not pretty circles - rectangles are fine, all tastes the same. Roll it as thin as you can, only a couple of millimetres thick.
7. Dust it off a little if it's too floury, carefully peel off table, and place in hot, dry pan. While it starts to cook, begin the next one, reflouring the table first... but keep an eye on the pan, turning the tortilla over once it starts to bubble. It should have little brown spots on it. It only takes a few seconds per side - if the heat's too low, they'll be hard and crunchy, so cook them hot and quick for nice soft ones.
8. As the tortillas cook, put them on a dinner plate inside a plastic bag, and close it up after you put each one in. This keeps them soft and warm until you're ready to eat.
I'm afraid mine didn't turn out quite as I expected initially. It was difficult to get the tortillas into the hot pan without them wrinkling up or folding over on themselves. I did, however, manage to get a few decent looking tortillas made.

Tuna and salad wrap for lunch! Very tasty.
Wednesday, January 27, 2010
Simple Tomato and Grapefruit Salad
During the summer months we have a LOT of barbecues. I vary the meat but find it hard to create new delicious salads with the basic fruits and veges that I can buy at our local store.
I had a ruby grapefruit in the fruit bowl that has been sitting there for a while and some tomatoes which were a bit pale, so I thought I'd make a salad from these. But what would I add to make it a bit more 'special'?
Remembering that some basil seeds planted a few months ago actually developed into basil plants, I thought I'd use some fresh torn basil leaves.
Tomato and Grapefruit Salad
2 tomatoes
1 ruby grapefruit
6 basil leaves
French Dressing (I used my home-made dressing)
Cut tomatoes in half and slice. Then cut each of the halved sliced tomatoes in half again. Peel and slice grapefruit in the same way so that you have sliced 'quarters'.
Spread into a shallow glass dish. Top with torn basil leaves and drizzle dressing over the top. Leave to marinate for an hour or so.
I forgot to take a photo before this was all devoured!
Thursday, January 21, 2010
The Amazing Thermomix

Thought I'd better write about this fantastic machine in case anyone is interested in learning more about it.
The Thermomix is a German designed multi-purpose kitchen machine. It can basically replace your blender, bread machine, mincer, food processor and stick blender. It can even replace your mixer in many cases.
It not only mixes, it whips, grinds, beats, minces, crushes, purees and it also cooks and steams. As if that's not enough, it will also weigh your ingredients as you add them!
I bought my TMX in September after seeing the new TM31 demonstration by Elsie McDowell. I was thoroughly convinced that this is what I had to have. I generally have to have every kitchen gadget that I see, so I was really hoping that it would live up to my expectations. It's expensive!
Well, I can say it certainly has and gone well beyond them. I use my TMX every single day, often three or four times. I make by bread in it, make cakes and biscuit doughs, pizza bases, sauces, jams and chutneys. I prepare a lot of the evening meal in the TMX, if not the whole meal. I've made fantastic vegetable stock paste that I keep in the fridge and use to flavour soups, casseroles and gravies. Ice cream and sorbet have been on the menu lately due to the heat here in WA. I also make my little dog's meals in it. She's ancient - we just worked out that today is the 16th anniversary of the day we got her for my son's 11th birthday!!
If you want to find out more about the Thermomix, go to this site: Thermomix in Australia.
This February/March, I'm planning to have a Varoma demonstration. This is the steaming part of the machine. If you would like to come along, please let me know!
Wonder Bread
I've been working on my bread recipe for months now, trying to get it perfect. It's pretty much exactly how I like it now, so I'll put the recipe here for posterity.
I use Lauke's Wallaby Bread Flour, available at Woolworths. I often put in some other types of flour in the mix such as Kamut and Spelt. These are available from All About Bread in Greenwood. I've made it with only Kamut and it still worked perfectly. Kamut is an ancient grain from Africa. Similar to Spelt, it has gluten, but in a more easily digestible form than wheat.

WONDER BREAD
500g bread flour (a blend is wonderful)
300g tepid water
1 Tbsp lecithin (optional)
1 Tbsp honey
1 Tbsp oil
3 Tbsp seeds (I use pepitas, sunflower and flax)
1 Tbsp salt or, to taste
1.5 tsp Wonderfresh (avail from All About Bread)
1 tsp Natural Bread Improver ( '' )
2 tsp dried yeast
Mix on for 5 minutes. Leave to rise in
  until peeking out of the top. (Thanks to Isi from Portugal who is on the Thermomix Forum. This was her idea to leave it in the TMX for the first rise.) Poke down and mix on for another 2 minutes. Roll out to a rectangle shape and roll up like a sausage, place in large tin. Leave to rise in fridge overnight, if desired, or as normal. Bake for 25 minutes on 200. Remove from tin and place back in oven for 5 minutes. (optional for really crusty bread)
If you're one of those unlucky people who don't own a Thermomix, you could still do this in the breakmaker or by hand.
I use Lauke's Wallaby Bread Flour, available at Woolworths. I often put in some other types of flour in the mix such as Kamut and Spelt. These are available from All About Bread in Greenwood. I've made it with only Kamut and it still worked perfectly. Kamut is an ancient grain from Africa. Similar to Spelt, it has gluten, but in a more easily digestible form than wheat.

WONDER BREAD
500g bread flour (a blend is wonderful)
300g tepid water
1 Tbsp lecithin (optional)
1 Tbsp honey
1 Tbsp oil
3 Tbsp seeds (I use pepitas, sunflower and flax)
1 Tbsp salt or, to taste
1.5 tsp Wonderfresh (avail from All About Bread)
1 tsp Natural Bread Improver ( '' )
2 tsp dried yeast
Mix on
If you're one of those unlucky people who don't own a Thermomix, you could still do this in the breakmaker or by hand.
Seafood Laksa
This is a delicious hearty meal that grows and grows - I always have to put it in a larger pan. Normally, the noodles, cooked seafood and bok choy are placed in the bowl and the hot coconut milk stock poured over. I find this too difficult, so I make it all in the pan.
This time, I used canned bean sprouts and soba noodles as I'd run out of rice noodles (shock, horror! They're on my shopping list as I type...)
SEAFOOD LAKSA
I use a range of different seafood such as prawns, firm fleshed fish, scallops and/or squid in this dish.
Start with:
5 stalks spring onion
1 red chilli
1 clove garlic
Chop everything (can blitz in Thermomix) and fry gently in either ghee or oil. Add:
1 can coconut milk
1 can Valcom Laksa Sauce
1 cup chicken stock
3 tbsp fish sauce
1 stalk lemongrass, chopped into three and bruised with a knife
4 kaffir lime leaves
1 lime, cut in half - squeeze juice into stock, then throw lime halves in too.
2 cups chicken stock
4 Tbsp fish sauce
Cook on low heat until well blended. When almost ready to eat, add:
Seafood
Rice noodles and hokkein noodles
chopped coriander stems
finely julienned carrot strips
When seafood is nearly cooked add:
julienned snow peas
chopped bok choy

Place lid on pan and when allow to come to simmer. Stir gently and push everything into the coconut milk stock. Add more water if necessary.
Serve in large bowls and top with:
chopped coriander leaves
bean sprouts

Enjoy!
What Makes a Great Cook?
So often I hear TV chefs and cooks go on about making a great meal using the "freshest ingredients", or, "the best you can afford". To me, a great cook should be able to produce a tasty meal with nothing more than limp celery, old cabbage, some freezer-burned mince and some spices.
I'd love to be able to nip down to the Fresh Produce Market, pick up a few fresh scallops, some coriander,fresh beans sprouts and a couple of limes for a light quick entrée. But, realistically, I have to make do with vegetables and meat that comes in to our local store once a week.
I have a wonderful freezer that I make good use of. It's full of marinated chicken, lamb and steak as well as frozen mango cheeks, strawberry puree, raspberry coulis and diced watermelon. I freeze a lot of fruit to use in pies or for sorbets. My freezer also has a good supply of fish and prawns that I've purchased already frozen. I always have frozen veges on hand too, as the store may run out of green veges and they rarely get beans in unless I order them.
So, I reckon I can prepare a great meal without having the "freshest ingredients", direct from the grower or straight off the boat. It's all about planning ahead. Whenever I'm in Perth, I always bring home fresh fish and seasonal vegetables and fruit.
My pantry... man, I could live off my pantry for several months and never have to shop!

Pantry Left
 Pantry Centre
 Pantry Right
If I want to cook bread, biscuits, cakes, a curry, a tagine, a risotto, Italian, Chinese, Japanese, Greek or Malaysian I have everything I need. All the spices, oils, beans, nuts, grains, flours, dried fruits and specialty ingredients I need.
My worst nightmare is deciding that I'm going to make something delicious for tea and find that I don't have the right ingredients. I know that necessity is the mother of invention, and I've certainly had to substitute from time to time, but I love to have all ingredients at hand.
My worst nightmare is deciding that I'm going to make something delicious for tea and find that I don't have the right ingredients. I know that necessity is the mother of invention, and I've certainly had to substitute from time to time, but I love to have all ingredients at hand.
Chocolate Salami
The idea of this appealed to me. Something that isn't quite what it seems...
But, having made it and tasted as I went, I'm not sure that it is as delicious as I was hoping. I will taste it again once it's set, but generally, if the mixture tastes good, the finished product will.
The recipe originates from The British Larder website and parts of it are made in the trusty Thermomix, which is how I found the recipe in the first place.
I change it a little, as I don't like craisins (dried cranberries) in sweet things. To me, they go well in savoury dishes, adding that sweet/sour tang. I used glace cherries and omitted the sugar.
Chocolate Salami
Chop cherries into pieces and add Kahlua.
Put the broken up chocolate and butter in Thermomix and melt for 4 minutes/speed 2/50°c until melted. Add condensed milk, vanilla and egg yolks through the top and continue to cook for 6 minutes/speed 2/50°.
Allow to cool for about 10 minutes. Pour into biscuit and nut mix and add cherries with Kahlua. Mix well with a wooden spoon. Leave for another 10 minutes until beginning to harden.
Divide into two and place onto plastic wrap. Roll into a fat sausage shape. Twist ends.
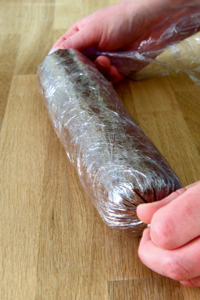
You can then roll in a sushi mat to achieve a texture. Refrigerate for around 2 hours.
Remove the cling film and then roll the salami in cocoa powder/icing sugar mixture. You can then wrap in baking paper and tie with string to give that classic delicatessen salami look, but I wouldn't bother. Cut thin slices to serve.
I have found this lacking a bit of flavour. Next time, I would add some crushed peppermints and perhaps some peppermint flavouring. Alternatively, another flavouring such as cherry would be good.
But, having made it and tasted as I went, I'm not sure that it is as delicious as I was hoping. I will taste it again once it's set, but generally, if the mixture tastes good, the finished product will.
The recipe originates from The British Larder website and parts of it are made in the trusty Thermomix, which is how I found the recipe in the first place.
I change it a little, as I don't like craisins (dried cranberries) in sweet things. To me, they go well in savoury dishes, adding that sweet/sour tang. I used glace cherries and omitted the sugar.
Chocolate Salami
- 80g unsalted butter
- 200g dark chocolate
- 200g marie biscuits
- 55g toasted almonds
- 55g pistachios
- 50g pecans
- 80g glace cherries
- 2 egg yolks
- 80g Kahlua
- 2 tsp vanilla essence
- 80g Condensed milk
- Cocoa powder & icing sugar blend
Chop cherries into pieces and add Kahlua.
Put the broken up chocolate and butter in Thermomix and melt for 4 minutes/speed 2/50°c until melted. Add condensed milk, vanilla and egg yolks through the top and continue to cook for 6 minutes/speed 2/50°.
Allow to cool for about 10 minutes. Pour into biscuit and nut mix and add cherries with Kahlua. Mix well with a wooden spoon. Leave for another 10 minutes until beginning to harden.
Divide into two and place onto plastic wrap. Roll into a fat sausage shape. Twist ends.
You can then roll in a sushi mat to achieve a texture. Refrigerate for around 2 hours.
Remove the cling film and then roll the salami in cocoa powder/icing sugar mixture. You can then wrap in baking paper and tie with string to give that classic delicatessen salami look, but I wouldn't bother. Cut thin slices to serve.
I have found this lacking a bit of flavour. Next time, I would add some crushed peppermints and perhaps some peppermint flavouring. Alternatively, another flavouring such as cherry would be good.
Subscribe to:
Posts (Atom)