Sunday, December 9, 2012

Where Have All The Aussies Gone?

Sing along with me.....


Where have all the Aussies gone?
Long time passing
Where have all the Aussies gone?
Long time ago
Where have all the Aussies gone?
Overseas companies took them on
When will we ever learn?


Another one bites the dust
And another one gone, and another one gone
Another one has gone bust
Hey, they'll come and get you too
And you won't be the last.

 http://www.abc.net.au/news/2012-12-03/rosella-goes-into-receivership/4404696

Tuesday, October 30, 2012

Tuna and Pineapple Casserole

A quick and easy recipe given to me by a friend to which I've added some extras to make it go further. The original recipe didn't have noodles, peas or corn. Since I'm also feeding my Father-in-Law, I wanted to add some vegetables to make sure he's getting his daily serve!
I made the sauce in the Thermomix, but it's easily made on the stove top.


Tuna and Pineapple Casserole
The Bush Gourmand


2 onions
60g butter

2 or more tsp curry powder to taste
2 Tbsp plain flour
1 1/2 cups milk


1 large tin tuna, drained
1 x 450g can pineapple pieces (I only had crushed pineapple, so used that)
1/2 cup frozen peas
1/2 cup frozen corn niblets
1/2 cup vermicelli soup noodles
salt and pepper (I used 3 tsp chicken stock powder instead)
Home made breadcrumbs
melted butter

Peel and cut onions into quarters. Chop for 3 seconds/speed 5. Scrape down and repeat. Add butter and saute on speed 3/reverse/100, setting timer for 5 minutes.
At the 4 minute mark, add flour and curry powder and continue sauteing for a further minute.
Set dial to speed 2/reverse/1 minutes and gradually add milk. Cook on 100/5 minutes/Reverse/speed 2-3
Add noodles and pineapple, including juice and continue cooking for a minute or so.
Place tuna into a casserole dish with peas and corn and pour sauce over. Mix gently.
Mix breadcrumbs with melted butter and place over the top of the casserole.
Bake for 20 minutes in a moderate oven.

Friday, October 12, 2012

What's For Dessert?

The question is now answered with a great new e-book written by the queen of desserts and all things Thermomix, Tenina Holder.

This great new e-book can be downloaded from the Super Kitchen Machine site by clicking the link on the right hand side of the blog page - Super Spatula.

There are more than 23 easy recipes with full colour photos. If you know Tenina, there'll be a lot of chocolate involved!
Recipes include cakes, tarts, ice cream and pies and all are super delicious and easy to make.

At only $15 Canadian, this book is a steal. You can download it up to three times in case your computer has a hissy fit or you forget where you saved it...  Good idea is to print a couple of copies off and keep it in a plastic display folder.

Enjoy!
Megan


Hayfever = Gluten and Dairy Free Diet

October is hay fever month here in the bush. The rye grass is playing havoc with everyone's sinuses, including mine.
Today is horribly windy, making it a hazard to even step outside without covering my nose and mouth. Every time I head out, I tie a tea towel around my face and look like a bandit from a bad western movie.

Previously, when I suffered hay fever for months on end, a naturopath recommended a gluten, dairy, sugar and yeast free diet. This was way back in the 90's when it was nigh on impossible to buy anything that was gluten free. I lost kilos because I couldn't eat anything. I managed to stay on this restricted diet for 6 whole months and didn't suffer from hay fever again for years and years.

It returned with a vengeance around this time last year and lasted the whole month. This year, I'm going on a self-imposed gluten and dairy free diet to see if it makes a difference. It's so easy these days and especially easy if you have a Thermomix.

Recipes are easy to find and ingredients are readily available, even in stupidmarkets.
The first place I will search on the internet for good GF and DF recipes is Quirky Jo's blog. She has an amazing array of ideas and recipes and is a mine of information.
I also like Forum Thermomix (the first and the best) for ideas and help with recipes and ingredients.

Today, I made a GF bread using my own recipe and Jo's Buckwheat and Almond Crepes/Tortillas
The bread has just gone into the oven. The crepes worked brilliantly - they're cooked in the sandwich press!
I used two together for my chicken wrap:


They were super soft and easy to roll. Because they were quite thin, I used two together. As crepes, they would be just as delicious.

I'm not a big dairy eater anyway - except for cheese! I love Jo's Cashew Cream as a replacement for regular cream. Cashews are very nutritious and are quite sweet, so work well in this way.
I drink soy milk - a left over habit from when I was dairy free for six months. One thing I could never go back to was cow's milk. Can't stand the smell or taste. I also like Cashew and Almond Milk, but find that soy is better for menopause symptoms. Nut milks are good for custards and sauces, though.

Hopefully, my hay fever symptoms will be fewer and less severe this season. I'll report back!

Megan

Wednesday, October 10, 2012

Thermomix Forum


Forum Thermomix is my go to place whenever I'm looking for a recipe to make in my Thermomix.
Looking for a Thermomix recipe? Then this is the best site on the internet.

Not only is there an amazing array of TRIED and TESTED recipes there, but there are honest reviews of many of the recipes in the Thermomix Recipe Books. Do a search for thermomix recipes and google should take you to the right place.
There's nothing worse than wasting a mass of ingredients on something that either doesn't work out or just isn't nice.

My advice to anyone who owns a Thermomix is to sign up to www.forumthermomix.com and check out the place. There's a bunch of great people there who will help you with any queries that you have. Many have had their machines for years. A couple of them are consultants, but most are just enthusiastic users who will offer their years of experience.

Don't put .au at the end of the link. That will take you to the official Thermomix recipe community. While many of the recipes there are good, the forum isn't active so there's very little interaction with other Thermomix users.

The original is always the best: www.forumthermomix.com


Sunday, September 30, 2012

Kitchen Sink Cookies

Yes, I know, I named them "Cookies". My pet hate, Americanisms creeping into our language.
But, these look like cookies, so I'm calling them cookies, OK?

I based them on a recipe I found on a really interesting blog, www.lickthebowlgood.blogspot.com.

The kitchen sink part is because they have pretty much everything in them except it. Cornflakes, oats, nuts, coconut, choc chips, there's not much else you could add and they're delicious! I make them fairly large and cook them for 15 minutes because I like them really crunchy. If you like a softer inside, cook for only 10 - 12 minutes.
I've put in cup measurements for those poor souls who don't own a Thermomix. The cornflakes could be crushed in a food processor, but only for a second or so.

Make sure that you put ALL the dry ingredients in the mixing bowl. When I made these, I checked in the oven after a few minutes to find them spreading all over the tray. Yep! There was my flour still sitting in the sifter. Not to be outdone, I scraped the mess back into the bowl and added the flour. That's why I have no choc chips, because they all melted. But I like them this way as well. So if you like, you can melt the chocolate and add with the wet ingredients.


Kitchen Sink Cookies
The Bush Gourmand

90g Cornflakes (2 1/2 cups)
120g butter, cubed
120g brown sugar
150g white sugar
1 Tbsp milk
1 1/2 tsp pure vanilla
2 eggs
210g (1 1/2 cups) plain flour
1 1/2 tsp bi-carb soda
2 cups rolled oats
1 cup shredded coconut
1 cup chopped walnuts
80g dark choc chips

Preheat oven to 180 C. Grease or line baking trays.
Crush cornflakes by blitzing on speed 7 in 1 second bursts until lightly crushed, not crumbs. Set aside in a large bowl. Add dry ingredients and mix well.
Cream butter and sugars for 20 seconds on speed 4. If butter is hard, use heat (37) for the first 30 seconds.
Add wet ingredients and mix for another 10 seconds on speed 4.
Pour into bowl with dry ingredients and mix well.
Roll into walnut sized balls and place on trays allowing room for spreading slightly.
Press down with heel of palm.
Bake for 10 - 15 minutes, depending on how fudgy or crispy you like your cookies.


Saturday, September 29, 2012

Layered Salad to Go

When browsing through Pinterest, I found a picture of salad in a jar. It looked so cute with it's little string around it with a fork. But, pretty impractical as jars are heavy and they break! Also, you then have to transfer the salad to another container. More washing up!


I decided to make my salad in the container that I planned to eat it from. A simple clear plastic container worked well. Dressing goes on the bottom, then veggies that won't go soggy. I used sweetcorn, chick peas, sliced snow peas and carrot. On top of that went tomato and cucumber with a little finely diced shallot and then finally lettuce.
My container was wide enough to fit a splade in, so it was simply a matter of mixing it all together at lunch time and eating it!

Instead of chick peas, you could use lentils, tuna, chicken, roast beef or silverside. Spinach or salad leaves can replace the lettuce. There's an endless variety of salads to be made, it just depends on what you have in stock.

Megan

Sassy Water


This is the most delicious tasting and refreshing drink! It's simply filtered water with sliced lemon, sliced cucumber and mint, but don't be fooled, the flavour is amazing. I can't stop drinking it. Some recipes also contain a teaspoon of grated ginger. I'll try that next time.

It's apparently used as a detox in a four day diet that's supposed to give you a flat tummy. I'm sure I'd have a flat tummy if I cut out wine, beer, bread, potatoes, biscuits, cakes, salt and sugar. But where's the fun in that? And, how long would that last anyway?

I don't believe diets work. Reducing calories (sorry, just can't work with kilojoules) and increasing exercise will help you lose weight, but it has to be something you're prepared to do for ever. It's all about metabolism and everyone's metabolic rate is different.
The body is designed to use all the energy that is taken in and if  there is excess, it's deposited as fat. The fat serves a purpose in that it will be converted to energy when there is nothing coming in, ie, when we're dieting.

My theory is that some people have a caveman metabolism where the body will conserve energy as fat and slow right down when calories are reduced. As soon as calories are increased, it will store them to protect against that starvation period just experienced. So weight appears to come back very quickly. This is how yo-yo dieting comes about.

When I find I am gaining a little weight, like right now over winter, I'll just exercise more. I don't reduce my food intake, because as soon as I try to do that, all I can think about is food! I find that once the exercise kicks in and weight begins to drop ever so slightly, then the food intake lessens automatically.
But, I'm lucky and have my Dad's metabolism. He managed to eat and drink everything and never gain any weight. I have gained weight over the years, but not so much that I'm overweight - yet.

I just like drinking this flavoured water. I drink a lot of water during the day anyway, so this just makes it nicer. If it gives me a flat belly, well that's just a bonus, but I'm not holding my breath...

Megan


Sunday, September 16, 2012

Miso Stock

Oh delish!

I've had a packet of Japanese Miso Stock sitting in my pantry for about 3 months. I bought them for some purpose since forgotten.
Tonight, tea was to be a pot roast, a 'girello' I'd purchased recently. The girello is a cut normally used for corned beef, the eye round. It was very lean and I felt perfect for slow cooking in a deliciously flavoured stock. Sealed on all sides, it was ready for the liquid. This is when I remembered the miso stock. So, after adding water, a few teaspoons of these little golden granules were added and immediately they gave off that typically Japanese fragrance. I decided that nothing else was needed.

The end result, after slow cooking for some hours, was the most deliciously flavoured tender beef with mouth watering gravy made from the stock. Root vegetables added to the stock were also subtly flavoured.
The umami flavour means that little salt is needed to gain maximum flavour.

After I'd eaten my meal, I tasted the stock on it's own and couldn't resist a bowl of it! Wow, it was something to be savoured. I highly recommend using miso stock granules (sometimes known as dashi granules) instead of salt or stock powders.

It can be purchased from ichibajunction.com.au an online store that sells Japanese ingredients and foods.

Simple Living

I often ponder on the things in our life that are most important. The three I always come up with are family & friends, health & happiness.

Our family is very close anyway, though we don't always keep in touch with extended family members as we should. Everyone is so tied up in their own lives, caught up in the daily struggle that is life. My close friends live right here in my town and can always be relied upon.
I find Facebook is a great way to keep up with family and friends that don't live nearby.

Our health is good, with only the occasional back problems, but nothing serious and nothing that some exercise would probably help. We eat well, though I do need to cut back on the sugar and alcohol!

So how do we define happiness? I'm generally a happy person, I always look on the bright side and enjoy simple comforts such as a warm bed with a contented husband beside me and plenty to eat and drink. I love to look out on to beautiful paddocks of flowering canola and enjoy hearing native birds in my garden.
But, more than anything, I really enjoy being able to make my own products, be they food products or skin care products. I get a lot of pleasure in producing something for a quarter of the price I would normally have to pay. Even greater joy knowing that it's far superior to anything I can buy.

Now if only I could grow a decent garden. I'm not a gardener's bootlace, and don't really enjoy being out in the dirt plucking at weeds and pulling up metres of couch runners that invade and seem to go down in the earth as far as China. But, I am encouraged in seeing what my dear late niece has achieved out at our farm house.

She has made very simple gardens with succulents and drought tolerant plants with the odd annual here and there. Bits of rusty farm equipment, old tin cans and bent up metal buckets are used to enhance and  decorate the area. She carted dozens of rocks in a wheelbarrow from the paddocks and has used them as both features and as borders for her gardens. A fantastic fire pit has also been created out of rocks.
There's no lawn, just gravel that has been pressed in and raked to remove loose rubble. Most plants were gifted cuttings. Water from the bathroom and kitchen is collected in a bucket which is dug into the ground where the outlet pipe ends. This is used to water the garden as there's only rainwater available and that is too precious to waste.

Such creativity and enterprise has made me re-consider my garden. It's a hodge podge of bushes, a few trees and two underused vegie patches. Lots of lawn, (which I must start to mow myself instead of waiting for Steve to do it) which I will reduce. A bit of green lawn is lovely to look at in summer, but we have way too much to keep watered, mown and weeded.

So, I will be making some changes in the next few months and hopefully producing some home grown vegetables and overhauling my garden space to make it more practical to maintain and more in tune with our climate and environment. Watch this space!!

Saturday, August 25, 2012

Super Scrubbies


Following on from Super Kitchen Machine's success with the Super Spatula, Helene has now introduced Super Scrubbies.

Here is some information about them, taken directly from Helene's Super Kitchen Machine website:

Often called "the world's finest pot-scrubbers" or "Rainbow Scrubbies". Amazingly gentle and strong, they are 'scrubby' but not scratchy, ideal for cleaning stainless steel. These colorful little lovelies conform beautifully to the Thermomix bowl for a sparkling shine every time!

Tough, powerful and GENTLE super for scrubbing Thermomix bowl and machine base too!

In the kitchen: safe for: blenders, pots & pans, sinks, cast iron, enamel or ceramic stove tops, ovens, glassware, china, cutlery, glass shelving, countertops, cutting boards, stoneware.
Great for removing coffee stains from cups, scrubbing potatoes, carrots , root vegetables, compost bucket, non-stick pans
In the bathroom: cleans porcelain sinks, tubs, showers. Removes hard water deposits from chrome, tile, and glass doors
Around the house: cleans window screens, old plant pots, garden tools, BBQ racks, grills.
Body care: smoothes rough heels and calluses,cleans dirt and paint from hands.

For $54CA, approximately $52AU, you get 15 of the smaller scrubbies, 15cm x 12cm and 2 of the larger ones, 23cm x 15cm.

Just click on the Super Spatula graphic to the right of the page and you'll be taken to the Super Kitchen Machine website where Helene has some great deals happening! Postage is included and if you're in the country, your package will arrive faster than a package from Perth!

Saturday, August 18, 2012

Baked Vegetable Samosas


I adore the Curry Puffs that the Malay community in Katanning are famous for and wanted to make something similar but without the deep frying.
I checked quite a few recipes and came up with my own variation. The pastry is very easy to work with and scraps can be rolled twice. You can use ready made puff or shortcrust, but it's not as nice.

Baked Vegetable Samosas
Makes about 30 cocktail size

1 onion, quartered
1 clove garlic, peeled
2cm piece fresh ginger, peeled and cut into coins
2 Tbsp ghee or oil
1 tsp mustard seeds
1 tsp ground cumin
2 - 3 tsp mild curry powder (I use one that I make myself)
500g potatoes, peeled and diced
3/4 cup water
2 tsp salt
1 cup frozen peas
Juice of one lemon
chopped coriander or mint

Pastry
290g plain flour (I use bread flour)
1/2 tsp salt
125 chilled butter, cut into cubes
1/3 cup iced water
1 egg yolk
Extra egg yolk and 1 Tbsp water

Chop onion, garlic and ginger in Thermomix on speed 5 for a few seconds. Scrape down bowl.
Add ghee and set machine to cook on 100, 3 minutes, speed 2.
After 2 minutes, add spices and continue to cook for a further minute. Add potatoes, water and salt and cook on 100, reverse, speed soft for 10 minutes or until potatoes are soft and starting to break up. (No MC).
Add frozen peas and lemon juice and cook for a further 3 minutes on 100. Make sure most of the water has evaporated. If it hasn't, drain it off. Different potatoes absorb differing amounts of water. Some may need even more. Add chopped coriander and set aside to cool.

Preheat oven to 200 degrees C. Line a baking tray with baking paper.
Wash and dry bowl thoroughly.
To make pastry, place flour, salt and butter into bowl and blend on speed 5 for a few seconds. Add water mixed with egg yolk and blend again until it starts to come together.
Turn out onto silicone mat and press together. Wrap in mat and refrigerate 20 minutes.
Divide pastry in half for ease of use. Roll out thinly and cut 10cm circles. Mix egg yolk and water together in MC. Brush each circle with egg yolk mixture and place a heaped teaspoon of filling in the middle.
Press edges of each piece together to make a semi circle.
Beginning on the right hand side corner if you're right handed, pinch the pastry together and pull away slightly, roll it over on top of itself. move to the left of this bit and repeat. Continue all the way around the edge until you have the typical plaited look of a curry puff.
Pierce pastries all over with tip of a knife (I forgot to do this with the first batch and some of them burst at the seam) and brush with egg yolk mixture. Bake for 15 to 20 minutes or until golden.

Serve with  Coriander Raita or Sweet Chilli Sauce

Coriander Raita
1 cup plain yoghurt
1/2 small cucumber, de-seeded and grated and drained in a colander lined with paper towel
2 Tbsp chopped coriander

Mix together.


Thursday, August 16, 2012

Megan's Magdalenas


These delicious, light as a feather little cakes came about when I was searching online for a good patty cake recipe. Apparently, these Spanish cakes are eaten at breakfast! I can't imagine eating a cake for breakfast....

Megan's Magdalenas

Makes about 16

140g raw sugar
4 eggs, room temperature
125g melted butter (melted in microwave and allowed to cool a little)
250g plain flour
1 Tbsp baking powder (yes, 1 tablespoon!)
zest from one lemon
1 Tbsp milk
extra sugar

Pre heat oven to 200C
Place patty pan liners into muffin tins.

Blitz sugar on speed 9 for a few seconds. Scrape down.
Place butterfly onto blades.
Add eggs to bowl and whip for 7 minutes/50 degrees/speed 4.
Set dial to 1 minute/speed 4 and add melted butter through the hole.
Add milk and lemon zest through the hole and continue to mix on speed 4 for a few more seconds.
Remove butterfly.
Add sifted flour and baking powder and mix with aid of spatula on speed 3 - 4 until incorporated, about 20 seconds.
Pour into prepared patty pans to only half fill.
Sprinkle with extra sugar. This is important. If you don't sprinkle with sugar, the tops will become sticky after a few hours. If you're planning on icing them, then don't bother sprinkling with sugar.
Bake for 16 - 18 minutes until they're a light golden colour.


The first time I made these I didn't ice them. They were devoured, just the same. This time, I've iced them with lemon icing.

Wednesday, August 15, 2012

Reinventing Leftovers

I always make large amounts of bolognaise sauce, beef stews and casseroles. I normally like to freeze the leftovers. This time, I did as my mother did before me and created a new dish from old leftovers. Not that old, only a few days!

My bolognaise sauce was made with Mediterranean vegetables of eggplant, zucchini & mushrooms. By the time I added everything, I had an enormous pot of sauce! The basic passata is made with a reduction of sautéed celery, garlic, onion and carrot in the Thermomix. Add to this canned tomatoes, tomato paste, herbs and seasonings. This is then added to the sautéed mince and chopped vegetables and cooked slowly for a couple of hours on the stove top. The day I made this, we ran out of gas, so it was cooked in the oven in a large Bessemer pan with a lid.

After eating it for a couple of days, there was still a fair bit left, so tonight I made it into a casserole.

Bolognaise Casserole
Leftover bolognaise sauce
Cooked pasta - I used macaroni
1 egg

Cheese Sauce (Thermomix)
500g milk
50g plain flour
100g cheese - mix of parmesan and tasty
2 eggs
salt and pepper
pinch nutmeg

Preheat oven to 200 degrees C.

Place bolognaise sauce into a casserole dish and mix in cooked pasta and beaten egg.
To make cheese sauce, grate cheeses in Thermomix first on speed 7 - 8 for a few seconds and set 50g aside.
Add remaining ingredients to the other 50g of cheese in the TM bowl and cook on 90 degrees for 8 minutes on speed 4.

Add about 1/4 cup of the cheese sauce to the bolognaise in the dish and mix. Pour the remaining sauce over the top and sprinkle with remaining 50g grated cheeses. Bake for about 40 minutes or so.


Thursday, August 9, 2012

Asian Salad

This is a delicious but simple salad made up with ingredients I had in the fridge. Any other vegetables could be added, such as capsicum or snow peas. Instead of pine nuts, try toasted slivered almonds.

The magic of this salad is in the dressing. It's superb and can be used for other salads to give an oriental twist. You could add a drizzle of sesame oil to it, but I had run out. A touch of chopped red chilli would also be a good addition. Add some crunchy noodles if you like.
Throw in some sliced poached chicken breast and you have a light and luscious lunch.

Asian Salad
Serves 4

1/4 cabbage, sliced thinly
1/2 carrot, grated
1/4 red onion, finely diced
1 stick celery, finely slice on the diagonal
handful snow pea sprouts, chopped
handful pine nuts, toasted

Dressing
4 Tbsp olive oil
2 Tbsp Soy Sauce
2 Tbsp Lemon Juice (try Lime for a slightly different flavour)
1 clove garlic, crushed
2 Tbsp brown sugar

Combine and shake together.

Pour a couple of tablespoons of the dressing over the salad just before serving.

Sunday, July 22, 2012

Home Made Condensed Milk


I made this for no other reason other than I wanted to know I could!

There's a couple of recipes around. The easiest is this one:

1/3 cup hot water
2/3 cup sugar
1 cup powdered milk - this can be full cream or skim milk
3 tablespoons butter

Add all ingredients to Thermomix Bowl and blend for 3 minutes on speed 3 - 4.

The tastiest is this one:

1 litre whole milk
400g raw sugar
25g butter

Place in the Thermomix bowl and cook on Varoma at speed 4.5 for 45 - 50 minutes.
The high speed is necessary or the milk will volcano out of the Thermomix. The MC needs to be in place to stop any extraneous spitting!
This tastes and looks like regular condensed milk. I used raw sugar, so the final result appears a bit darker than normal.
If cooked for longer, you will get caramelised Condensed Milk.

Here's a great mayonnaise recipe:
Mix 200g of the condensed milk with 125g white vinegar, 2 tsp dry mustard and 1/2 tsp salt. This is basic mayonnaise.
For a delicious Broccoli Salad Dressing,  add 2 tsp wholegrain mustard, 1/2 cup yoghurt and juice of 1/2 a lemon.

Monday, July 9, 2012

Light Vanilla Ice Cream


Light Banana Ice Cream with Peaches and Real Passionfruit Jelly

My dear husband loves everything that comes in a bottle, jar or tub. It has to be bought stuff, none of this home made rubbish.
Unfortunately, as with most things in our lives, I'm the complete opposite.So, everything I make is an imitation of a bought product - 'Rosella' Chutney, Tomato Sauce and Pickle, 'Peter's' Ice Cream, 'Cottees' Jam.
The normal ice cream that I make is a very creamy one with 8 egg yolks and 600ml of cream, making it very rich and nothing like Peter's Ice Cream. A search for a 'light' ice cream turned up one that used only 2 yolks and whole milk.
I doubled the recipe and churned half in my Kitchen Aid Ice Cream bowl and half in the Thermomix (after adding 2 bananas). There was absolutely no difference in texture. Both were a little icier than the rich, creamy ice cream, but the flavour was wonderful.
I've since read that adding a tsp of gelatine will make it creamier and less icy, so I've added that to the recipe.
The ice cream does go quite hard, so it's best to take it out 10 to 15 minutes before serving.
Delicious with Real Jelly.

Light Vanilla Ice Cream
150g sugar
25g cornflour (3 Tbsp)
pinch salt
880g whole milk
2 egg yolks
3 tsp vanilla extract
1 tsp powdered gelatine

Add all ingredients, except gelatine to the TM bowl and cook for 7 minutes/90/speed 3 - 4.
Sponge the gelatine over hot water.
While continuing to mix on speed 3, add the liquefied gelatine. Make sure it's all incorporated and there are no lumps.

For Ice Cream Maker:
Pour into a jug and place plastic wrap over the top. Cool completely.
Follow directions for your Ice Cream Maker. For Banana Ice Cream add a mashed banana.

Place in a container in the freezer.


For Thermomix:
Pour into a large flat container and freeze. If you are making this the next morning, or you have a second bowl, place TM Bowl in the freezer too.
Cut frozen custard into chunks and place into TM bowl. Churn on speed 8 until creamy and softened.  For Banana Ice Cream  add a chopped banana and continue to churn until smooth.
Place in a container in the freezer.


Sunday, July 8, 2012

Raspberry and Apple Jam


When I made Real Raspberry Jelly recently, there was some delicious looking raspberry flesh remaining. I used this to make a yummy Raspberry and Apple Jam.
The taste is very similar to the 'jam' that bakers use in doughnuts and cream matches.

Raspberry Apple Jam

200g or so of leftover Raspberry
2 green apples, peeled and cored, cut into 1/4's
4 Tbsp of sugar
Juice of 1 lemon
Raspberry flavouring, if desired.

Place everything into TM bowl and cook on Varoma speed 2 for 10 to 15 minutes. Check regularly and add a little water if necessary.
Sieve to remove raspberry seeds.
Place in a jar and refrigerate.


Real Jelly

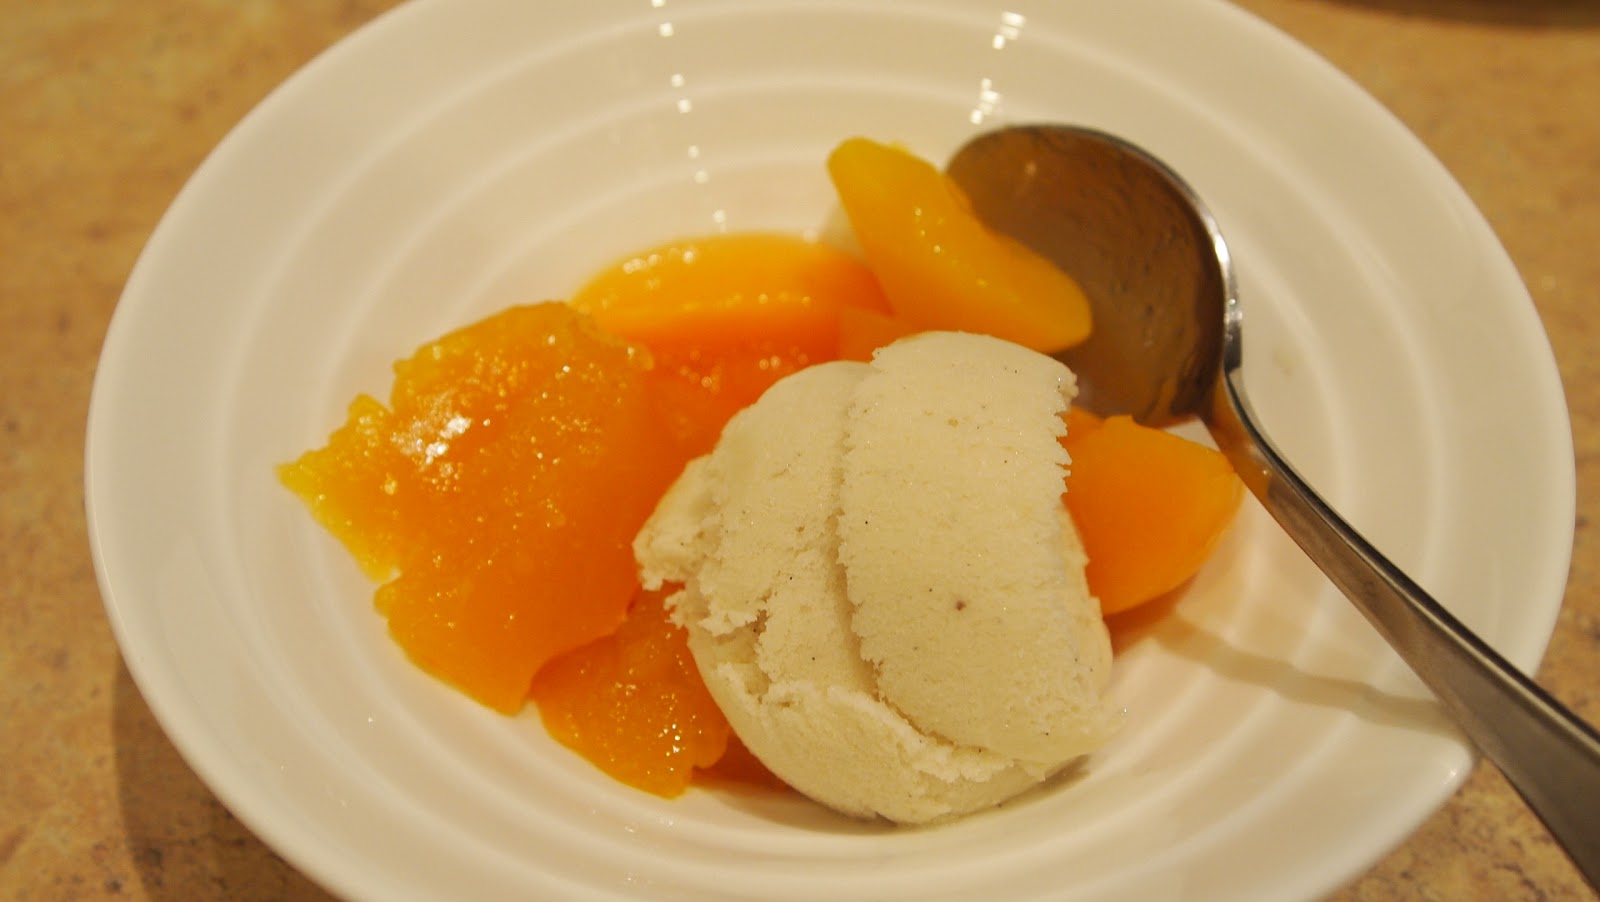
Real Passionfruit Jelly, Peaches and 'light' Banana Ice Cream

I recently made a trifle with some of my left over Thermomix Sponge Cake. I make an English Trifle, sponge on the bottom, spread with strawberry jam, sprinkled heavily with sherry, pour warm custard over the top, then broken up set jelly on top when cold. Optional toasted slivered almonds on top and served with whipped cream.
When I added the jelly, I licked the spoon (as one does) and the jelly tasted horrible! It had a gross, sickly sweet artificial flavour. Since I didn't have enough jelly to cover two Trifles, I began a search for  Real Jelly, made with Real Fruit.

The folks on forumthermomix.com helped me out with some recipes. The first one I made was a Raspberry Jelly. I was amazed at the wonderful flavour of fresh raspberries and will be making this one again and again.
Next, a Mandarin Jelly which was simply divine. Today, I'm making Passionfruit Jelly as I have masses of whole passionfruit in the freezer picked from our vine last summer.

These jellies are well worth the effort, which really is minimal anyway. My dear husband is in heaven. For the last few nights he's had jelly for dessert. First, Trifle with Raspberry Jelly, then Raspberry Jelly with tinned pears and whipped cream, then Mandarin Jelly and home made 'light' Vanilla Ice Cream. Tonight it'll be Passionfruit Jelly with tinned peaches and 'light' Banana Ice Cream.

I used Gelatine Sheets to make my Raspberry Jelly, but since I've run out of those, I'll be using regular powdered gelatine. There's not a lot of difference, the sheets are just easier to use. If you want to make a moulded jelly, you'll need to add more gelatine, probably half as much again.

I halved the following recipe:

Real Raspberry Jelly
550g Sugar
Juice 2 lemons
1 litre water
750g frozen raspberrries
6 sheets gelatine or 30g powdered gelatine

1. Place sugar into TM bowl and blitz on speed 9 for 30 seconds. Scrape down and add lemon juice and water to bowl.
2. Cook for 5 minutes/100/speed 2.
3. Add raspberries and cook for 4 minutes/90/speed 2.
4. Place into a bowl and allow to cool.
5. Place a sieve over a bowl and line with muslin or cheesecloth. Pour liquid into sieve and allow to drain. This may take about 4 or 5 hours. Reserve the left over raspberry flesh to make Raspberry Apple Jam.
6. Place half of the liquid back into the TM bowl and reheat for 5 minutes/90/speed 1. Meanwhile, soak gelatine sheets in a bowl of cold water until soft. Squeeze out. Or, if using powdered gelatine, place in a small glass dish with a tiny bit of water and stir over a container of hot water until melted.
7. While still mixing on speed 2, add gelatine through hole in TM lid. Continue to mix for 1 minute on speed 2 until it's all dissolved.
8. Add remaining liquid and mix lightly.
9. Pour into a glass dish to set in the fridge.

Real Mandarin (or Orange) Jelly
110g sugar
500g freshly squeezed mandarin juice (about 7 mandarins)
Thinly peeled skin of one mandarin
½ sheets gelatine or 15g powdered gelatine

1. Place sugar into TM bowl and blitz on speed 9 for 20 seconds.
2. Add juice and peel and cook for 5 minutes/90/speed 2. Strain to remove peel and place juice back into TM bowl. Meanwhile, soak or dissolve gelatine as above.
3. Set TM for 1 minute/speed 2 and add gelatine through hole in the lid.
4. Pour into a bowl to set in fridge.

Real Passionfruit Jelly
150g sugar
16 - 20 passionfruit
Juice of ½ an orange - around 35g
Around 2 ½ powdered gelatine or 3 sheets


1. Blitz sugar on speed 9 for 20 seconds. Scrape down.
2. Place passionfruit pulp and orange juice in TM bowl and heat for 3 minutes/70/speed 1 - 2.
3. Strain seeds out using a sieve.
4. Weigh liquid back into bowl and add about 20g water per 100g juice. Take note of new weight.
5. Measure out 1 tsp powdered gelatine per 100g liquid and sponge over hot water.
6. Set TM for 1 minute/70/speed 2 and add liquefied gelatine through the hole. 
7. Pour into a dish and set in the fridge.


Tuesday, July 3, 2012

Creamy Pasta with Salmon & Peas


This recipe is based on a Pasta Carbonara Recipe from a Forum Thermomix member, known as Rainbow. I have adapted it so much, that I now call it my own.

I was halfway through demolishing this when I remembered that I should take a photo! It was so delicious. I asked my darling husband what he thought and his response was, 'It's the best pasta I've ever had'.
Coming from someone who usually just says, 'That was good', that is incredibly high praise indeed.

Creamy Pasta with Salmon & Peas
Can serve up to 4


50g Parmesan Cheese
2 shallots, peeled and halved (or half an onion)
1 garlic clove, peeled
40g butter
150g Fettuccine pasta
350g warm water
200g cream (or a mix of milk and cream cheese)
100g white wine
2 heaped tsp fish stock powder (chicken will do)

1 beaten egg (doesn't make a difference if you leave it out)
1/2 cup frozen peas
Cracked Black Pepper

2 to 3 pieces Atlantic Salmon
Lemon Pepper (or any seasoning you like),
Lemon Juice

First, crumble the Parmesan by chopping on speed 7 for 5 seconds or so until finely ground. Set aside.
Don't wash the bowl.
Place shallots and garlic into bowl and chop on speed 5 for a few seconds.
Add butter and sauté for 4 minutes, Varoma, speed 1. You can reduce the butter, but I love butter...
Add remaining ingredients except for egg, peas and pepper and cook on Reverse, 100, speed soft for 13 minutes.
Add beaten egg, (or forget to add it, as I quite often do) peas and pepper and cook for 2 minutes, Reverse, 100, speed soft for 2 more minutes. Place into ThermoServer and sprinkle half of the reserved Parmesan over the top.

Don't wash the bowl. Add 500g hot water to bowl and place Salmon into Varoma Tray. Sprinkle with seasoning and lemon juice. Steam on Varoma, speed 2 for 7 minutes or until done to your liking.

Top Pasta with salmon and serve with a green salad and remaining Parmesan Cheese.

Salmon can also be flaked and added to pasta to make the meal go further.

Almond Cashew Milk


As mentioned in a previous post about dairy free alternatives, I make my own nut milk which I use primarily for hot drinks.

I've come up with the best recipe, I believe that looks very similar to milk and won't separate in my tea or coffee.

Cashew Almond Milk
30g raw almonds, skin on
30g raw cashews
960g filtered water
1 Tbsp coconut oil
30g Maple Syrup
1 tsp lecithin granules*
1/2 tsp bi-carbonate of soda**

Place nuts into TM bowl and grind on speed 9 for 20 seconds.
Add remaining ingredients and cook on 60 for 4 minutes at speed 4.
Gradually turn up to speed 8 and blend for 30 seconds.

Place a large square of muslin or cheesecloth into a mesh strainer and strain over a jug. Squeeze gently to extract all liquid.
Pour into bottle and refrigerate. Keeps for about 4 days.

*The lecithin granules are available at Health Food Stores or at www.2brothersfoods.com. The reason for adding is to assist with stopping separation in the bottle.
**The bi-carb increases the alkalinity of the milk, helping the lecithin in preventing separation in tea and coffee, both of which are acidic.

Sunday, July 1, 2012

Beef Stroganoff


Today is a rare day when my husband is home. The weather is so lovely today inviting a late BBQ breakfast on the patio this morning.

At around 1pm, I was starting to feel hungry again and had a hankering for Stroganoff.

I've made the Beef Stroganoff from the Every Day Cookbook a couple of times, but have replaced the beef with chicken, and I really like it.
However, I thought I'd try another recipe developed by a fellow blogger, Chelsea, published on her Full Little Tummies Blog
This recipe came about as forum members reviewed the original EDC recipe and tweaked it to their tastes.
The changes I made was to cook it for 5 more minutes as I had used more mushrooms and my steak was still a little frozen. I added ground black pepper instead of cayenne pepper. I also cut my steak in the traditional stroganoff way, thinly sliced strips.

N.B. It appears that Chelsea has removed the recipe from her blog. Since I've made quite a few changes, I think I can add the recipe here. I like to acknowledge Chelsea's original idea as it's brilliant. My version is below.

I used 500g of Scotch Fillet. This may sound an extravagant use for good quality steak, but this small amount of meat makes enough to feed 6 people with pasta and vegetables. For tender steak, whether using rump, blade or scotch, cut semi frozen steak into strips 4cm x 2cm. Turn the strips on to their side and slice thinly. You get about three slices per strip. This means that the meat has been cut against the grain and it will be so tender it will melt in the mouth!

It's amazing how much the Thermomix can cope with. Here's the bowl after placing  in all ingredients:


The finished Stroganoff went into the Thermoserver while the pasta was cooked in the rinsed out bowl.


So incredibly easy and so delicious!

1 onion, peeled and halved
2 garlic cloves, peeled
100g bacon rashers, cut into strips
30g butter
500g rump or scotch fillet, (blade steak may take a little longer)
250g Swiss Brown mushrooms, sliced
2 Tbsp tomato paste
100g red wine
50g water
1 Tbsp Thermomix Vegetable Stock Concentrate (recipe found in the Everyday Cookbook that comes with the Thermomix)
3 Tbsp cornflour
1 Tbsp Dijon Mustard
2 Tbsp Worcestershire Sauce
150g sour cream
1 Tbsp paprika
¼ tsp ground black pepper
pinch dried thyme or tsp fresh 
1 tsp dulse flakes or Himalayan Salt
fresh chopped parsley to garnish

Drop garlic on to blades running at speed 7. 
Add onion and chop at speed 5 for a couple of seconds. Scrape down and chop again if necessary.
Scrape down and add butter and bacon. Cook on 100/3 minutes/speed 1/Reverse.
Add remaining ingredients and cook on 100/25 minutes/soft speed/Reverse.
Place in Thermoserver whilst preparing pasta or cooking mashed potato in the Thermomix. I like to serve with a green vegetable or salad as well.

Megan


Easy Marmalade


If you've ever made marmalade before, you'll know that it entails lots of cutting up of fruit, making it a time consuming process.

Not so with the Thermomix! It's all in one chopping and cooking functions allow the whole process to be completed in the one machine in fraction of the time.
This took no time at all to make after tea last night and I enjoyed it on my toast this morning.

It's always a good idea to add a lemon or at least the juice of a lemon to help the marmalade set.

Orange Marmalade
500g oranges or a mix of citrus fruit
150g water
400g sugar

Wash oranges to remove wax. Cut into quarters or eighths and remove pips.
Place into TM bowl.

Chop for about 6 seconds on speed 6. Add water and cook for 15 minutes on speed 1 - 2.

Add sugar and cook for a further 15 minutes, Varoma temp,  on speed 2. Place basket on top to catch any spitting. Check for setting point by placing a small amount in a little dish and placing in the freezer.


Place into sterilised jars and let cool before placing lids on top and storing.


Thursday, June 21, 2012

Money Saving Challenge 2

Week One of my Money Saving Challenge and I overspent by $25. I'm not too disappointed because I entertained twice on the weekend, with one night being a Family Curry Night for 10 people.

This week I've spent a total of $74.79 on food so far. That included a Pantry Pack of plain flour and some casserole beef that was on special.
Not bad, though there're a few pantry items that need replacing such as mixed fruit, brown sugar and sultanas. Today was a big baking day - three lots of biscuits and two cakes.


I've been making sure that I remember what's in the fridge and use everything up rather than finding something weeks later shoved to the back and growing fur.

There was some left over Mussaman Beef Curry from the Curry Night that was turned into Curried Beef Pies today for lunch.
A piece of pumpkin looked a little sad, so that was steamed in the Thermomix a couple of days ago and turned into Pumpkin & Ginger Cake and Pumpkin Fruit Cake today.  I substitute 100g of sherry for part of the water in the Fruit Cake Recipe.

The beef on special was semi frozen then minced to make a Potato Pie for tea tonight. Minestrone Soup for lunch tomorrow with Frozen Chicken Stock and Roast Lamb for tea tomorrow night. I'll be making ice cream over the weekend and some bread. I have some delicious fig syrup left after glacéing figs in summer, so that can be drizzled over ice cream for a quick dessert.

My sister has given me some citrus fruit so I'll be making some marmalade next week which means I'll have to add sugar to my shopping list...

Yours in frugalness,
Megan


Sunday, June 10, 2012

Money Saving Challenge


A challenge has been put out by a member of the Forum Thermomix to only spend $100 or less a week on groceries. When I look at my grocery bill, I'm flabbergasted at how much I spend sometimes.
Often, it won't be very much as I tend to shop around the outside of a supermarket - fresh fruit and vegies, dairy, meat, but because I buy in bulk my bill can blow out at times. I'm also a sucker for specials and can't resist potato chips and chocolate...

Readers may remember that my sister and I undertook and Freezer and Pantry Challenge some time ago. We vowed to use everything in our pantries and freezers and not to shop unless absolutely necessary. We did this for a month and it certainly did save us both some money.

But, I still had to re-stock my pantry as I can't cope with not having everything I need at my fingertips when I decide I'm going to cook! We have such a wide variety of meals inspired by foods from all over the world that I simply must have all the spices, flours, nuts, seeds and dried fruits to be able to make these.

The freezer is another story. I've recently started freezing meals in vacuum pack bags so that they're flat in the freezer. Instructions (for Snaggers) are written in texta on the bag for re-heating in the microwave. The trouble is, there's not a lot of space in my freezer for these as it's full of stuff! Bags of frozen fruit, cakes, home made pies, anyone would think I'm preparing for a famine.

So, starting tomorrow, I will attempt to spend under $600 a month on food. Some may still think this is a little high, but I do prepare meals for my FIL (Father-In-Law) and occasionally for my DD (Dear Daughter) and her fiancée. Often, DS Number Two will be home for a meal or two as well.

I'm planning a bulk buy of meat on Tuesday, so will blow the first week's budget, but it should even out in the end.

Anyone keen to join the challenge? Allow $50 per week per person and don't include personal items, alcohol (Thank goodness!) or pet food.

Tuesday, June 5, 2012

Crumpets


Not something that you think of making yourself when they're so easy to buy.

The recipe can be found here on the Forum Thermomix and has been included in Dani Valent's In The Mix cookbook.

You need to start the night before making the batter. Once it has proved (about an hour), it can happily sit in the fridge for two days, if necessary. Why two days? Normally, one would cook the crumpets the following morning, but just as I was about to pour the batter into the egg rings, I had a call from nearest and dearest to head out to the paddock.

We all know what that means, could be ten minutes, could be two hours. So, back in the fridge the batter went.
It was fine the next morning and crumpets were delicious.

I honestly wouldn't bother making them again as it's much easier to buy them, but it's nice to know that I can make them if I want to.


Friday, June 1, 2012

Happy Accident with Quince Paste

This week my sister came to visit to make Quince Paste in the Thermomix. She normally makes her Quince Paste on top of the tile fire and cooks it for seven hours, stirring regularly. The colour is a deep ruby red. Once she saw how I'd made it in the Thermomix in an hour and a half, she just had to try it!
The quinces were from her tree and since there were so many we made one lot while she was here and then I made a second lot after she'd left.

The only thing that I've found about Quince Paste made in the Thermomix is it doesn't have that gorgeous rich red colour. It's more of an orange, but does go a bit darker after it's stored for a while. The texture is probably better than that made on the stove and it's so much easier!

During the second lot of cooking, I was called out to help shift paddocks for an hour. The Quince Paste still had over eight minutes to go, but I turned it off and dutifully piloted the tractor.

I wasn't sure what I was going to face on my return, so imagine my surprise when I opened the lid to discover a deep ruby red paste! I gave it a further 10 minutes, but it probably didn't really need it. It had slow cooked in the Thermomix in that hour as the temperature was still at 80 after that time due to the large quantity of paste holding the heat in.

So, if you like your Thermomix Quince Paste to be a wonderful deep ruby colour, turn it off after 40 minutes or so and leave in the bowl for an hour.

Here's the comparison. The first batch is on the left.


Sunday, May 27, 2012

Make Your Own Mince


Voila! Minced Steak

Today I wanted to make pasties so that Steve and his dad can take them for lunches during seeding rather than boring sandwiches.

Unfortunately, I had no mince in the freezer. But, I did have some chuck steak which I could easily turn into mince in the Thermomix!

To mince any meat, including chicken, lamb and pork, it's best to be semi frozen and cut into 2cm cubes. Do small amounts at one time - I prefer to do about 100g each time. Place cubes into the bowl and mince on speed 7 for around 8 - 10 seconds.
It does make a racket, so be prepared!

So, no need to buy mince again!


Home Made Korma Sauce


Why buy pre made Curry Sauces and Pastes when you can easily make your own in the Thermomix?

Today I'm making a Beef Vindaloo and a Korma sauce for tomorrow night's tea. Curries are best eaten the day after they're made as the flavours intensify overnight. The Korma Sauce will be used for a Vegetable Korma to go with the Vindaloo. I'll be making my sister's Spiced Rice in the Thermomix while the curries are reheating in the Varoma. Delicious, cost effective and easy. What more could you ask?

Both recipes come from Fast and Easy Indian Cookery which is probably one of my most favourite Thermomix cookbooks.


Friday, May 25, 2012

From the paddock to the table

Here's a great video on YouTube that tells it as it is about how incredible our farmers really are.
It's fairly long, but has some amazing statistics that are worth remembering:

Year of the Farmer

Megan

Sunday, May 13, 2012

Salmon Dinner


One of the aspects I love about the Thermomix is the ability to do an entire meal in an incredibly short period of time.

Fish and Chicken Fillets especially lend themselves to this way of cooking everything at once in the Thermomix.

Recently, I made a lovely meal for my son and his partner at their new home. The whole meal took only minutes to prepare and cook.

Salmon Dinner
to serve 2 - double amounts for 4

2 pieces Tasmanian Salmon (or any fish you like)
lemon pepper
juice and rind of one lemon
Mixed vegetables - I used truss baby tomatoes, broccolini, baby squash & green beans.
Potato and Sweet Potato - I can't give amounts, just enough to half fill basket for 2 and fill basket for 4.
30g butter
30g cream
s & p to taste

Sauce
Juice and rind of 1 lemon
Cream
2 Tbs Mayonnaise
Lemon Pepper
Fresh or dried dill
1 tsp Cornflour

Place peeled and large diced potatoes into basket and fill TM bowl with hot water to 1 litre mark Steam on Varoma for 5 minutes on speed 5 - 6.


Place mixed vegetables in Varoma Bowl and continue steaming on Varoma temperature for a further 5 minutes.


Meanwhile, prepare fish by placing on to scrunched wet baking paper on Varoma Tray.  Sprinkle with lemon pepper, juice and rind.

Steam a further 5 minutes or until fish is almost cooked.

Remove Varoma Trays and place onto a board or on the sink. Fish will continue to cook a little. I like my salmon pink inside.

Remove basket with potato and tip water out of TM bowl. Place potato back into bowl with cream, butter and salt and pepper.
Blend on speed 3-4 until smooth.


Place Varoma Tray back onto TM Bowl to keep everything warm while sauce is being made.


Sauce
Place cornflour into a small microwave safe jug. Add a little water to blend.
Tip juice from salmon into jug and whisk in juice, rind, cream, chopped dill and lemon pepper to taste.
Microwave in short bursts of 30 seconds. Whisk after each burst of cooking. Add a little water if too thick.
Test for seasoning.

Place a dollop of mashed potato and sweet potato onto plate. Top with salmon. Place vegetables around salmon and pour sauce over.

Serve to your amazed guests.

Enjoy
Megan


Quince Paste


Quinces have been around for years. They're hard, pale, ugly and nasty tasting when raw, but when cooked, they transform into luscious pink, fragrant deliciousness.

A friend recently gave me some quinces to make quince paste in the Thermomix (thanks Robyn!).
If making Quince Paste the traditional way, it would mean stirring every 5 - 10 minutes for 1 1/2 hours! It can stick to the pan and it is likely to spit and burn you while you're tending to it.

No thanks.

Jeff Brady, a Thermomix enthusiast and blogger, has developed this recipe which is published in Dani Valent's "In the Mix" recipe book. (Available through me or from the Thermomix Website.)
Jeff has the recipe on his blog, so I'll link it here, rather than reprinting it: Quince Paste

I did as Jeff suggested and placed the Thermomix in the sink with a towel underneath. I covered the opening with two layers of paper towel to prevent it spitting everywhere and let it do it's own thing for the 50 minutes it took to cook.
I did make one small change - instead of cooking on speed 5, I used speed 4. Also, please see my later post where I had a Happy Accident with Quince Paste to get that lovely rich, ruby red colour.

Quince Paste is wonderful on a cheese platter or just spread on fresh bread with lots of butter....

Enjoy!
Megan


Wednesday, May 9, 2012

Delicious Varoma Steak


Steamed Steak, you say? Yes, but there's more to it. Read on...


I've been reading about sous vide cooking, where food is vacuum packed, then cooked in a water bath at a controlled temperature. With the Thermomix cooking at specific temperatures, I imagined it would work well. Trouble is, it takes ages.

I love experimenting, so thought why not do the vacuum packing, but then steam the food? And that's exactly what I did with our scotch fillet last night for tea.

I have a Sunbeam Vacuum Sealing Machine that is fantastic. So, steak placed in bag - two to a bag and a marinade poured in. Seal in machine and then steam for about 8 minutes on Varoma temperature in the Thermomix. One pack in the Varoma Bowl and one in the tray.
Potatoes steaming underneath in basket.

The liquid remaining in the bag needs to be poured out before frying meat. I made a delicious sauce with this by adding a bit of cream, Worcestershire Sauce, water and then thickening with cornflour. The microwave was fine for this.

Marinade for Varoma Steak
2 Tbsp Soy Sauce
2 Tbsp Tomato Sauce
1 Tbsp Worcestershire Sauce
1 tsp onion powder
1/4 tsp garlic powder

Spread over steak while before sealing bag. Oil meat and place onto a hot grill to seal for 1 minute on each side for medium rare. I used a ScanPan grill tray , but a BBQ grill would be excellent too.


Medium Rare and Juicily Delicious!

The meat was tasty, tender and beautifully cooked. I highly recommend cooking steak in this manner.

Thursday, April 26, 2012

Curried Sausages

"They not fancy, but they cheap!"


I can just hear Luigi saying this. Sausages certainly aren't fancy and sometimes they're not that cheap, but we all love a good sausage casserole in this family.

My Aussie-style curries all have pretty much the same base ingredients. We like them sweet/savoury and warm to hot. I like to use good butcher's sausages when I can get them. Our local store sells butcher made sausages and they're very good quality, nice and meaty. I can't abide those supermarket excuses for sausages that are little more than cereal and seasonings in a sausage casing.

This is a Thermomix recipe but can easily be converted to a casserole on the stove. I've put it into two stages as one is steamed, the other cooked in the bowl.

Curried Sausages
The Bush Gourmand

Serves 4
Stage 1 ingredients
1 onion, peeled and quartered
30g sunflower oil
2 tsp curry powder
grated rind and juice of 1 lemon.
400g stock or water with 2 Tbsp TM veggie stock
1 large apple, peeled, cored and diced
450g - 500g mixed vegetables (I use 2 carrots, a turnip, beans, frozen peas and corn)
1/4 - 1/2 cup fruit chutney
3 tsp cornflour


Place onion and oil into TM bowl and dice on speed 5 for a few seconds. Scrape down and add curry powder.
Sauté for 4 minutes at 100C on speed 2 .
Add stock, veggies, apple, lemon and chutney. Test for salt and add if necessary.
cook for 15 minutes at 100C on reverse, speed spoon.
Add cornflour mixed with a little water and cook for 1 minute.
Transfer to Thermoserver.

Vegetables in Thermoserver

Stage 2 ingredients
500g -700g sausages
3 small potatoes, peeled and diced into 2cm cubes or 100g rice
Extras if liked: 1 diced banana, tomato paste, apricot jam (2 Tbsp)

Place 1 litre of water into TM bowl (not need to rinse) and insert basket. Add rice or potatoes to basket and place lid on bowl without MC. Place sausages into Varoma bowl and/or tray if using more than 500g, cover and fit onto lid.


Sausages ready for steaming

Cook on Varoma for 15 to 17 minutes or until rice or potatoes are cooked, but still a little firm.
Remove sausages and potatoes. Add potatoes to vegetable mix in Thermoserver.
Chop sausages into bite sized pieces when cool enough to handle. Add to Thermoserver.

Serve with a little chopped parsley and some roasted salted peanuts.

Sunday, April 22, 2012

Buttermilk Bread


This recipe is in the Thermomix Everyday Cooking book and I added some pepitas, pumpkin and linseeds. I've heard that it's a little difficult to make because the dough is very soft and sticky.

I've learned that with very soft doughs, one must not play with them too much. They will just get stickier! And, when you do try to knead a soft dough, there's a tendency to add flour to it to make it more manageable. This just changes the entire ratio of flour to liquid and the resultant loaf will not be as soft and fluffy as it should.

For the first rising of this loaf, I oiled my hands to remove the dough from the Thermomix bowl on to the ThermoMat. I then wrapped it up and placed it in the warm, turned off oven. Dough likes to have to work at rising, so wrapping it in the mat makes the dough work harder.

Unfortunately, I got chatting to my DD and when I checked the dough after a good hour, it had escaped from the mat and oozed into my oven! Luckily, I had cleaned the oven recently, so I just scraped it all back up and used a little flour to form a Vienna shaped loaf. The dough was already quite large, so instead of a second rising, I popped it into a cold oven set to 220C and baked it for around 20 minutes (still chatting with my DD, so not sure). The loaf rose beautifully without spreading out too much.

The inside is deliciously soft and fluffy and filled with holes like Ciabatta. I highly recommend this recipe. It would also make an excellent Cob Loaf.

Friday, April 20, 2012

Thermomix Consultant

I would like to announce that I'm joining the ranks of Thermomix and becoming a Consultant.

The idea has been swimming around in my mind for many months and it wasn't until I received a couple of encouraging emails  from complete strangers who'd read the article in Ripe Magazine that I seriously considered it.
Then another email came in from a Thermomix Group Leader also asking if I was interested in becoming a Consultant. Training was happening soon, so I thought I'd give it a go.

What a steep learning curve! I have to learn to use the Thermomix backwards, for a start! I'm not sure that I'm very good at selling things, but I do love my Thermomix, so I guess that's a start. So often, it sells itself anyway.

I'll be fairly busy over the next few months, but I still hope to keep The Bush Gourmand blog going with lots of interesting snippets and recipes.
So keep popping in and please leave comments, I love to hear from my readers.

Megan


Saturday, April 14, 2012

Pumpkin & Ginger Cake


This cake has come about as a member of the Facebook Group, Thermomixers requested that the recipe be converted to the Thermomix.
The conversion isn't as easy as a normal cake because the butter is heated with the sugars and the eggs need to be beaten into the pumpkin. A hot bowl and raw eggs do not mix, so the recipe steps have altered to suit the Thermomix method.

Pumpkin & Ginger Cake

220g chopped peeled pumpkin

Steam on Varoma for 15 to 18 minutes. Place pumpkin in the refrigerator to cool for around 20 - 30 minutes. 
Empty TM bowl and dry thoroughly.

Add to bowl:
100g brown sugar
140g Golden Syrup
125g butter, chopped

Heat on 80 degrees, speed 2 - 3 for 4 minutes.
Leave in bowl while pumpkin is cooling.

Pre heat oven to 180C, grease and line a deep 20cm cake tin. (Recipe says a square tin, but I used a round one)

Once pumpkin has cooled, add it to the sugar and butter mixture and blend for 30 seconds on speed 4.

Add to bowl:
2 eggs
Blend on speed 2 for a few seconds.

Sift into bowl:
140g SR Flour
1 Tbsp ground ginger
1 tsp bi-carb soda

Mix on dough setting for 10 seconds. Scrape down and under mixture with spatula. Mix on dough setting for another 10 seconds.

Place in tin and bake for 45 minutes. Cool in tin.

As I sat down to write this recipe, I inserted the title and said to myself, "Ginger! Oh @#$%!"
I'd forgotten to add the ginger to the dry ingredients! So, I raced into the kitchen,grabbed the cake out of the oven and stirred in the ginger. Fingers crossed!!
Whew! It worked fine. It's very moist and quite delicious.
Thanks Sarah.


Wednesday, April 11, 2012

Dairy Free Alternatives

Almond Sunflower Milk

I don't particularly like the taste of milk or cream, and have been buying soy milk for years to have in my tea and coffee.
It's expensive! And I waste a lot by taking my carton to places and forgetting it...

So,  I've decided to try some different sorts of milks that I can make at home. The recipes come from Jo Whitton, of Quirky Cooking fame.

First I made her Rice-Almond Milk. It was quick and easy in the Thermomix and I quite enjoyed the taste. Today, I made Almond and Sunflower Milk. I really like this one, it can be frothed in the Thermomix or with a stick blender. It does separate in the fridge, but comes together with a quick shake.

I've change the recipes a little, just to suit my taste.

Rice Almond Milk


50g brown rice
Place in a clean, dry Thermomix bowl and grind for 1 minute on speed 9

Add:
40g raw almonds

Grind on speed 9 for another 30 seconds.

Add:
960g filtered water
2 Tbsp coconut oil
30g maple syrup
2 Tbsp liquid lecithin (optional)

Cook 6 minutes, 60 degrees, speed 4.
Blend for 30 - 40 seconds, gradually moving dial to speed 8.
Strain through muslin placed in a strainer. Decant to bottle and refrigerate.

Almond Sunflower Milk


50g raw almonds
50g sunflower seeds

Grind in the Thermomix for 15 - 20 seconds, speed 9.

Add:
960g filtered water
2 Tbsp coconut oil (grapeseed, rice bran)
30g maple syrup (20g honey)
pinch sea salt
2 Tbsp liquid lecithin (optional)

Cook for 4 minutes, 60 degrees, speed 4.
Blend for 30 - 40 seconds, gradually moving dial to speed 8.
Strain through muslin placed in a strainer. Decant to bottle and refrigerate.


In both recipes, the nuts, rice, seeds can be pre-soaked in water overnight of for up to 24 hours. Then simply blend with other ingredients on speed 9 for 2 minutes. Proceed with cooking as per recipe.

I enjoyed a cup of Crio Brü with my freshly made Almond Sunflower Milk and I enjoyed it thoroughly.


And, waste not, want not, I added the leftover wet grounds from the Rice Almond Milk (200g) to a loaf of spelt bread that I was making. I added an extra 100g flour and 1/2 tsp yeast to make up for the extra liquid.

The leftover grounds from the Crio Brü go into the oven to dry out. They are then made into my extra special exfoliating Spiced Crio Latte Soap in my other life as Skinflint, maker of skincare products.
www.skinflint.com.au

Megan