As most followers of my blog would know, I like to try and shop locally. However, there is a limit to what my local storekeeper can provide, so I do shop elsewhere when necessary.
This online store was recommended to me by my Thermomix consultant. It's exceptional because they only charge a flat $5.00 fee for postage.
I ordered 10kg of goods recently, so to receive a package from Perth for only $5.00 is incredible.
http://www.2brothersfoods.com are just brilliant. The various things I bought included some fresh almonds, some yummy Sour Cream and Chives Soy Crisps, delicious Roasted, Salted Edamame, Peaz Wheelz and Rice Crackers. I also bought some flax seed and buckwheat for bread.
Everything was packed beautifully and arrived here very quickly. I can't recommend them highly enough.
Wednesday, December 28, 2011
Tuesday, December 20, 2011
Brown Butter Shortbread

I adore shortbread, but have never been successful in making it myself. It's usually too crumbly or too soft and just doesn't taste right.
Since Christmas is nearly upon us, I thought I'd try again. I've been inspired by a cookery programme I saw recently where a Scottish woman showed Rick Stein how she made shortbread. She didn't give the recipe, but she showed her method. The unusual part was that she didn't mix the ingredients until she got a dough. She simply put the processed ingredients into a dish and pressed it all in.
I used the recipe from the Anchor Ground Rice packet as there was still some in the pack. I must have bought it a while ago because I can simply make my own ground rice in the Thermomix these days.
As I was busy this morning, I forgot about the shortbread cooking away and it went quite golden in colour. This resulted in a delicious brown butter flavour as the butter hadn't quite incorporated in parts. So, I've renamed this recipe, Brown Butter Shortbread. I thought afterwards that I should have removed some of the sugar and sprinkled it on top, so have added that tweak to the recipe.
Brown Butter Shortbread
90g rice (ground rice if you don't have a Thermomix)
80g castor sugar
210g plain flour
180g cold diced butter
1 Tbsp castor sugar extra
Preheat oven to 170C. Grease and line a slice tin - place lining in so it comes up at the sides for ease of removal.
Blitz rice on speed 9 for a minute or so. If using regular or raw sugar, you can add it after 30 seconds to make castor sugar.
Place all ingredients into the Thermomix or food processor and blend on speed 6 until the mixture looks like breadcrumbs.
Press into slice tin and bake for about 7 minutes. Remove from oven and score into pieces. Sprinkle extra castor over the top and bake until golden.
Let cool in tin for 10 minutes or so. Lift out and cut into pieces along score lines.
Next time, I'll sub out about 30g of the flour for some almond meal.
Saturday, December 17, 2011
Pumpkin & Spinach Salad
This delicious salad is a combination of two or three and was inspired by two friends Julie & Robyn who both make delicious salads.
Pumpkin & Spinach Salad
1 small butternut pumpkin, peeled and diced to thumbnail size
2 rashers of bacon, cut into small strips and sautéed until crisp
2 spring onions, sliced into rings
1/4 cup pumpkin seeds, lightly toasted
1/4 cup pistachios, lightly toasted
1 packet baby spinach leaves
Dressing
40ml light olive oil
20ml soy sauce
20ml lemon juice
1 clove garlic - crushed
2 Tbsp brown sugar
Steam or microwave the pumpkin until tender, not mushy. Cool to room temperature.
Mix dressing ingredients together in a jar.
Lay spinach leaves on a large shallow platter and arrange salad ingredients on top. When ready to serve, top with the dressing. Serve at room temperature.
Sunday, December 4, 2011
Polish Coleslaw

This is a delicious version of a coleslaw. It's an all in one Thermomix recipe which, at a pinch, may be able to be made in a food processor.
The recipe was posted by JudyDawn on the Thermomix Forum and it originally came from a Thermomix Polish Cooking Class in Adelaide. Thanks Judy!!
I've renamed it, because it really is a coleslaw. I also added lemon rind as I love the flavour.
Polish Coleslaw (normally called Raw Vegetable Salad)
1/2 cabbage (around 250g), chopped into chunks
1 large carrot, peeled and chopped into chunks
50g dill cucumbers (I used cornichons, the baby dill cucumbers), chopped finely
1/2 green apple, core removed, chopped into chunks
1/2 red onion (I used brown), chopped into chunks
small bunch parsley
juice and rind of half a lemon
1 tsp sugar
salt & pepper to taste
3 Tbsp light olive oil
Place all ingredients (except cornichons) in the Thermomix bowl and process on speed 4 for 8 seconds, using spatula to assist with incorporation if necessary.
I processed for a further 6 seconds on speed 4 to get the right consistency. Best to do short bursts and check constantly.
Monday, November 21, 2011
Harvesting Time

Not just for the guys out there taking the off the crops, but for those in the kitchen feeding them. Today I have four to feed. Son 1 is home and working for another farmer, Son 2 is out harvesting and has his partner with him today and Snaggers (Dear Husband) is carting the grain.
So wraps it was all round. Once I'd cut, sliced and grated the fillings, it didn't take long at all. I like to use Tortilla Wraps. I used to like the Old El Paso ones, but they stick together too much, so now I use the Select Brand (Horrors! I do try to avoid these home brands that are taking over the supermarket shelves).
Some banana cake, chocolate peppermint biscuits, peanut biscuits, some fruit and some nuts as well as hot chicken wings and everyone is taken care of for the rest of the day.
Now, to think about tea!!
Wednesday, November 9, 2011
Lemon Cat Cake
I have a cat who loves people food. He gets up on the breakfast bar and tries to eat my toast in the mornings. He's horribly annoying and is constantly being growled at, but it doesn't deter him one bit.
He's a black cat, named Diesel. He has an attitude. He also likes raw cake batter...


He's a black cat, named Diesel. He has an attitude. He also likes raw cake batter...

Mmm, Lemon Cake

I love Lemon Cake

Tell me if I've got something on my whiskers...or on my chest fur, or my head, won't you?
For the record, everything will be sterilised in the dishwasher!!
Friday, October 28, 2011
Not Chocolate Ripple Biscuits

These are the most delicious chocolate biscuits I've ever made. The original recipe is from LeeJ on the Thermomix Forum. I've adapted it by doubling it and reducing the sugar, butter and bi-carb soda.
They can be easily made in a food processor or an electric mixer with a dough hook.
The following recipe makes about 100 biscuits, as I like to join them with peppermint icing. Halve it if you don't want to join them together. they look spectacular sprinkled with sifted icing sugar.
Not Chocolate Ripple Biscuits
400g plain flour
100g cocoa
1 1/2 tsp bi-carb soda
1/2 tsp baking powder
1/4 tsp salt
450gm castor sugar
270gm butter, room temperature, cubed
2 eggs
Preheat oven to 180 degrees C. Line two baking trays with baking paper.
Add all dry ingredients to food processor or bowl and blend.
Add butter and eggs and mix/process until combined.
Roll heaped teaspoons of the mixture into balls and place on trays allowing room to spread.

Press down gently with the pad of the thumb.

Bake for 13 minutes if you like a chewy texture inside the biscuit and 15 - 17 if you like your biscuits to be crunchy all the way through.
Remove from tray carefully with an egg slice as they're very soft and fragile until they cool down.
Ice with peppermint icing made with pure icing sugar. When made with pure icing sugar, icing tends to be harder and that's better for biscuits of this kind. They won't come apart and will stay crunchy for a few days.
Tips
Only ice a dozen or so at a time. These will also freeze well un-iced.
Raspberry flavoured icing would also go well with these biscuits.
Monday, October 17, 2011
Minted Cabbage Salad

Sick and tired of boring coleslaw? Me too. I just didn't want to make a creamy coleslaw to have with our steak tonight.
After a little googling, I found an interesting Lebanese Cabbage Salad.
Not liking some of the ingredients I made a variation which is fresh and delicious. My taste tester found the salad a bit too tangy, so I add some agave syrup and this gave a delicious flavour. Honey would also be fine.
If making it without the sweetener, I'd call it "Tangy Cabbage Salad".
Minted Cabbage Salad
1/2 green cabbage, thinly sliced (I used a mandolin)
1 red apple, cored and quartered, thinly sliced from the short end of each quarter
1/2 carrot, grated finely or sliced into very thin strips
the leaves from 4 or 5 stalks of fresh mint, chopped
Dressing
3 Tbsp fresh lemon juice
3 Tbsp good quality olive oil - could probably reduce to 2 Tbsp
1 Tbsp agave syrup or honey (optional)
1/4 tsp fresh crushed garlic - I use the Woolies one in the plastic jar
sprinkling white pepper
Place dressing ingredients in a jar and shake to blend. Pour into a shallow dish. Add sliced apple. This prevents it from going brown.
Mix all salad ingredients together - hands are the easiest utensils to use here. Add the apple and dressing and mix again.
Enjoy!
Megan Tuesday, October 4, 2011
Menu Plan October 3rd - 16th

This fortnight we're having:
Monday 3rd - Boeuf Bourguignon - this is my own recipe.
Tuesday 4th - Chicken & Almond Stir Fry with Hokkein Noodles
Wednesday 5th - Salmon Patties and Salad
Thursday 6th to Sunday 9th - Steve will be having freezer meals as I'm away.
Monday 10th - Creamy Lemon Chicken & veggies
Tuesday 11th - Pork Steaks in Mustard Sauce with Braised Cabbage & Apple
Wednesday 12th - Roast Chicken
Thursday 13th - Lasagne & Salad
Friday 14th - Left overs
Saturday 15th - at a Wedding!
I find menu planning is working really well. I might swap meals around a little if unforeseen events occur, but I stick to the menu otherwise.
Planning a menu means that I shop to that menu, so there's no last minute searching for some ingredient.
It also stops me buying things I think I might use and then find in the bottom of the fridge all mouldy weeks later.
Do you Menu Plan?
Megan
x
Monday, October 3, 2011
Boeuf Bourguignon
Simply put, this is a beef stew with bacon, mushrooms and red wine. I just love the French name!
I like to use Gravy Beef for my stews. It has a lot of 'gristle' which, with long slow cooking, melts down and provides a delicious flavour. I cook this in my Le Creuset oval casserole as it browns the meat beautifully and is equally happy on either the stove top or in a slow oven.
Megan's Boeuf Bourguignon
2 Tbsp oil
1 kg Gravy Beef
200ml beef stock (2 tsp beef stock powder in water)
200ml red wine
2 Tbsp oil, extra
2 onions, diced
375g sliced baby mushrooms
3 slices Parma ham, pancetta or short cut bacon
1 x 440g can diced tomatoes
1 tsp black pepper
5 or 6 sprigs of fresh thyme, leaves only or 2 tsp dried thyme
To thicken:
3 Tbsp plain flour
2 Tbsp oil
Brown diced beef in batches in hot oil. Deglaze the pan with stock and wine. Reserve, and then clean pan.
Add extra oil and sauté onions, mushrooms and ham or bacon. Add the remaining ingredients and cook on low in the oven or on the stove for around 2 1/2 hours or until beef is tender.
Mix oil and flour and stir in around 1/2 cup of the liquid from the pan. Add this mixture back into the beef and stir in well. Allow to cook for another 10 minutes or so on top of stove, stirring regularly.
Serve with baby peas and whole boiled new potatoes with sour cream.
Left overs make a great pie filling.
Monday, September 26, 2011
Home Made Chicken Stock

Home Made Concentrated Chicken Stock
Home made stocks can often make the difference between a nice meal and a delicious meal. If you've ever made a risotto with home made stock, you'll certainly never make one with powdered stock cubes or even bought liquid stock ever again.
I regularly make chicken stock from the carcass of a cooked chook or with trimmings from thigh cutlets.
Variations can be created through adding different flavourings to the stock as it's simmering. The most common variation that I make is an Asian inspired chicken stock.
Chicken Thigh Cutlets are often available at the supermarket at a great price compared to the more processed skinless boneless thigh meat.
I bought a 1.7kg pack recently at $5.49 per kilo, compared to $12.99 per kilo for boneless thigh meat. Total cost of It is a bit of work to skin and bone the thighs, but I make a nice stock with all the bits I cut off.
When I weighed the chicken meat, I had 930g, making the cost of just the meat $10 per kg. Considering I would normally trim the boneless thighs of fat and sinew, that's a pretty good result. Plus, I have a nice stock brewing with the trimmings.
Basic Chicken Stock
Carcass of cooked chook, raw carcass or trimmings from thighs
1 carrot, roughly chopped (don't bother peeling)
1 peeled onion, roughly chopped
2 stick celery, roughly chopped
bunch of parsley
2 bay leaves
few sprigs fresh thyme or a sprinkling of dried
salt and pepper
If trimmings and bones are raw, bake in a 200 degree oven for around 3/4 hour. Drain fat away (save it and use to roast potatoes - divine!).
Place bones, skin, fat etc in a pot with other ingredients except seasonings. Cover with water and place on a low flame. Let simmer gently for around 2 - 3 hours. Strain. Test for seasoning and add. Place in fridge to cool.
Good stock will become jelly-like in consistency. Skim off fat when cool. Freeze in ziplock bags or use within a few days. If you don't use it, place back on stove and bring to boil. Simmer for 10 minutes or so and place back in fridge.
Once strained, stock can be further concentrated by reducing it. Do this prior to seasoning. Bring to a simmer and allow to reduce by half.
Freeze in ice cube trays if not using within a few days
Asian Chicken Stock
Carcass of cooked chook, raw carcass or trimmings from thighs (raw is best for this recipe)
2 cm piece of fresh ginger, peeled and sliced
3 cloves garlic, peeled and crushed
2 Tbsp Soy Sauce
3 Tbsp sherry
1/2 tsp chilli paste (optional)
1 star anise
1 2cm piece cinnamon stick
3 Tbsp brown sugar
4 white peppercorns
Prepare and cook as above. Test for seasoning.
Thai Chicken Stock
Carcass of cooked chook, raw carcass or trimmings from thighs (raw is best for this recipe)
2 cm piece of fresh ginger, peeled and sliced
3 cloves garlic, peeled and crushed
2 Tbsp Sweet Chilli Sauce
3 Tbsp sherry
2 Tbsp Fish Sauce
3 Lime leaves
2 sticks lemongrass
2 tsp Chilli paste (optional)
Use basic stock in soups, risottos, casseroles, gravies and sauces. Use Asian or Thai stock for Asian style soups, curries and stir fries.
Enjoy!
Megan
Monday, September 19, 2011
Relaxing with a Book

I'm really enjoying this new recipe book. It's Donna Hay's 'Fast, Fresh, Simple'. I've been watching the series on Foxtel and have become quite enamoured with Ms Hay. She hasn't always been my favourite cooking celebrity, but since watching her TV Show, I've begun to appreciate her no-nonsense approach to food.
She has the quick & luscious approach of Nigella and the freshness of Jamie. I'm loving some of these recipes, though I do feel they're more 'lunch with the girls' dishes rather than family meals. I'm drooling over pretty much everything in there, but mentally cancelling out a lot of the recipes as I know that Dear Husband probably wouldn't be very satisfied with a meal so presented.
I'm so looking forward to summer and all the delicious freshness of salads and tasty barbecues, sitting outside relaxing and chatting after a working day. We entertain a lot in summer - it's so much easier and more relaxed eating outside rather than sitting at a dining table. Hopefully our patio decking will be completed this summer and we'll be able to really utilise our outside area to it's full potential.
Yours in deliciousness,
Megan
Monday, September 12, 2011
This Week's Meal Plan

I've been meal planning for about 6 weeks now and am finding it so much easier and so much cheaper.
My fridge and pantry aren't full of bits and pieces that I've bought at the supermarket 'just in case' or 'that looks nice' or 'I might like that'. My shopping list has my menu plan on the back and I don't deviate unless absolutely necessary.
My new fridge is much smaller than my older one and I can't cram as much in to it, which is just as well because things don't get lost at the back like they once did. Cleaning the fridge was like checking the results of a science experiment on various types of mould.
My pantry is still a bit overcrowded as I have all those packages and containers filled with things that I thought I might need. I have so many different types of grains, seeds and flours that I could survive for weeks if we were suddenly overcome by a nuclear meltdown or something.
So, to this week's menu. I usually try to have one beef or lamb, one pork, two chicken, one fish and one vegetarian meal one night is always left overs for when I have meetings or am out for the day and I don't have time to cook.
I usually have a roast on Tuesdays, but this week I'll be in Perth.
MONDAY: Greek Lamb Stew with fried Polenta & steamed green beans
TUESDAY: Left overs
WEDNESDAY: Char Sui Pork Stir Fry and Noodles
THURSDAY: Chicken & Leek Pie with Scrunched Filo Topping (practice for Shire Catering next week), Glazed Carrots and Smashed Potatoes
FRIDAY: Fish (Bronze Whaler from Albany) & homemade Chips with tossed salad & yummy special dressing and broccoli salad
SATURDAY: Left Overs
SUNDAY: Korean Beef Spare Ribs with Fried Rice
I notice that there's no vegetarian meal this week, but I have to practice my Chicken & Leek Pie to make sure it will be OK for Council. CWA are catering this month and I've revamped their menu with some more interesting options, so I'm putting myself forward to cook since I changed the menu.
I have a First Aid course all weekend, so left overs or maybe a meal from the pub on Saturday night.
I'm off to Perth tomorrow to have a tooth removed. I'm pretty distressed about it, but am hoping that I'll be able to get an implant to replace it. Bad dentistry years ago has caused bone damage in an infected root canal on a tooth that was crowned. I'm paranoid about false teeth and am determined to keep my teeth until the very end! So, all fingers and toes crossed for me, please...
Megan
p.s. The Fried Polenta was divine! Easy peasy with the Thermomix too. I'll post the recipe soon.
Wednesday, September 7, 2011
Orange or Lemon Cake

My Dear Husband has a penchant for Orange Cake, so it's something I make frequently.
Today I went to make it and had no oranges! Rather than make a trip to the local store to buy a couple, I chose to make a Lemon Cake instead. I had plenty of lemons thanks to some generous friends with lemon trees.
I used what I call a Custard Lemon. It's a Meyer Lemon, which is a cross between a lemon and a mandarin and is a native of China.
It has a very thin, smooth skin and is deliciously fragrant. In my opinion the meyer lemon isn't suited to savoury dishes, but is fantastic in cakes and desserts.
Orange (or Lemon) Cake
155g softened butter
3 eggs
2/3 cup (120g) castor sugar
1 cup (160g) plain flour
1 tsp baking powder
2 tsp grated rind
Combine butter and sugar and beat for 2 minutes. Add an egg and beat again. Repeat. Add the third egg with the flour and baking powder. Beat until combined. Stir in the rind.
Bake at 180C for 35 minutes in a greased lined orange tin. Turn out and ice with orange or lemon icing.
Update!
I wanted to make this recently and only had 2 eggs. I modified the recipe and actually liked this one better! Instructions are for the Thermomix, adapt for regular mixers as above.
Orange or Lemon Cake
130g softened butter or Dairy Soft
120g castor sugar
160g plain flour
1 tsp baking powder
1/2 tsp bi-carb
Juice and rind of half and orange (or lemon, remainder is used in the icing)
Combine butter and sugar and beat for 2 minutes, speed 4. Add 1 egg and beat again on speed 4 for 30 seconds. Add dry ingredients, juice and remaining egg and beat for 30 - 40 seconds, speed 3 or until incorporated.
Add rind and blend for 10 seconds, speed 2.
Bake in a greased lined loaf tin for 35 minutes on 180C
Make icing with 1 1/2 cups icing sugar, remaining juice and rind and 2 tsp butter. Can ice while still a little warm and top with coconut.
Monday, August 29, 2011
A Good Cup of Coffee

Why is it so difficult to buy a really good cup of coffee?
I was in Albany at the weekend and I bought a total of 3 cups of coffee at different places and only one was really drinkable.
I know my coffee choice is a little fussy - a long black topped up with soy, but I make a superb one at home with my little 15 year old Black & Decker percolator, so surely a cafe should get it right?
Unfortunately, that's just not the case. If the coffee is too strong, the acidic nature of the coffee is high and the soy milk will separate. Not only is this ugly, it's a nuisance as I have to keep stirring it to bring it back together. I've tried ordering a weak long black, but have found that it's just too weak and tastes rather like I imagine dishwater would taste.
Gloria Jeans was the first coffee I had and it was only just drinkable and that's because they allowed me to add my own soy milk. At $4.80, it was pretty expensive too.
The next was at Bay Merchants, for breakfast. Really too strong, but at least the proprietor noticed I wasn't drinking it and offered to bring some hot water to dilute it. Not sure of the price here, but I imagine it was pretty expensive too.
The last and worst was at Calamari's Cafe on the Beach. Not only did we wait ages to be served, I almost gave up waiting for the coffee it took so long. And when it finally arrived, it was served in a small glass with the coffee sitting at the bottom and the soy sitting on top. It was so excruciatingly strong that the soy milk would not even attempt to join the coffee, not matter how much one stirred!! I could only manage two sips out of that one.
The only plus here is that all their coffees are $4.00, no extra charge for the soy. But, since I couldn't drink it, that really became the most expensive coffee that I had all weekend.
Probably the only place in Albany I have enjoyed a good coffee is at Dome, but then the food is so boring at Dome that I don't generally bother going there.
So, today I'm sipping a delicious cup of coffee made at home just the way I like it!
Monday, August 15, 2011
Warm Eggplant Salad

When I make a lasagne, I layer thin strips of Mediterranean vegetables between the meat and pasta. Often, it's difficult to manage to get all the layers I want and last night I was left with strips of baby eggplant. I'd also forgotten to add the lovely fresh basil I'd picked up at the supermarket. What to do with the eggplant?
I was serving salad with the lasagne and had a germ of an idea which turned into a simple and delicious warm salad.
Warm Eggplant Salad
5 or 6 baby eggplant, sliced longways
olive oil
bunch of fresh basil
splash of balsamic vinegar
Saute eggplant in oil - it will absorb it all, so be generous.
Place in a serving dish and tear over basil leaves.
Drizzle with balsamic, toss and serve.
Sunday, July 3, 2011
Pumpkin Soup

Pumpkin Soup must be the most ubiquitous soup in the world. It seems whenever there's a soup of the day on a restaurant menu, it's going to be pumpkin. Everyone loves it and it's cheap and easy to make.
When I go to a restaurant, I like to try something I haven't had before, so find it really annoying when chefs take the easy way out and make a plain and boring pumpkin soup. There are so many things you can add to it to make it different, yet still delicious.
Here's the adaptions I like to do to take pumpkin soup up a notch in the culinary stakes.
Thai Pumpkin Soup 1
Chop an onion and saute in a mixture of butter and oil with 2 tbs of red curry paste.
Add chopped peeled pumpkin that has been microwaved or steamed for 5 minutes or so.
Add chicken stock or water and chicken stock powder and cook until pumpkin is soft.
Process and add up to 1/2 can of coconut milk.
Season to taste.
Serve with chopped coriander.
Thai Pumpkin Soup 2
Make in the same way as above, but use a blend of pumpkin and sweet potato. Add some grated fresh ginger for extra zing.
Curried Pumpkin Soup
Make using the same method as Thai Pumpkin Soup, but add Indian Curry Paste such as Korma or Tikka.
Instead of coconut milk use light pouring cream or plain yoghurt and serve with pappadams.
Roasted Pumpkin Soup
Place 2 tbsp oil in baking dish and place in pre heated 200 degree oven.
Microwave or steam pumpkin
Place in roasting pan and bake until browned on all sides.
Add to sauteed onion and proceed as normal.
Roasted Pumpkin Soup 2
Use a mixture of carrot and pumpkin or sweet potato and pumpkin
4 P's Soup - Pea, Pasta, Pancetta and Pumpkin
Saute onion as normal and make regular plain pumpkin soup. When cooked add some pouring cream or cream cheese before blending. Add to this mixture some cooked ribbon pasta, fried diced pancetta (or bacon), some frozen peas (or corn niblets).
Test for seasoning and serve with crusty bread.
Pumpkin & Roasted Cherry Tomato
The acid in the tomatoes adds a wonderful tang to the soup. Just add to plain pumpkin soup, no other flavours are needed.
Roast some cherry tomatoes in olive oil in a hot oven until the skins burst. When cool enough to handle, pop them out of their skins and add to your pumpkin soup. Process, top with some chopped chives or parsley and serve with crusty bread.
No more boring pumpkin soup! If you have any further ideas, please list in the comments section below.
Sunday, June 26, 2011
No Fail Sponge Cake
I had a card with this recipe of my Mum's that I wrote out years ago for this "No-Fail Sponge Cake". When writing it down, I'd written next to the title "...yeah, sure".
Some years later, (and many failed sponges later) I came across the recipe card and thought I'd give it a try. Much to my utter amazement, I made my first successful sponge cake!
I've made it many, many times since and have even left out the raising agents and it still worked, though wasn't quite as light.
Recently in Nyabing, the local CWA held a cooking morning where we demonstrated how to make Cream Puffs and my No Fail Sponge Cake.
Here's a photo of a couple of successful students with their sponge:

Unfortunately, the commercial oven wasn't ideal and they didn't rise quite as much as they should have, but they were still good sponge cakes!
No Fail Sponge Cake
4 large eggs, room temperature (stale eggs are best)
1/2 cup caster sugar
1/2 cup cornflour
1/2 cup custard powder
1 tsp plain flour
1/2 tsp bi-carb soda
1 tsp cream of tartar
Preheat oven to 180C fan forced
Grease and line the bases of 2 high sided 20cm cake tins with baking paper and flour the sides.
Using whisk attachment of mixer, beat eggs for 8 minutes. Beat for an extra 2 minutes if you have beater blades.
Meanwhile, sift flour, custard powder and raising agents three times.
Add sugar and beat for a further 3 minutes.
Use whisk from mixer (or beater blade) to incorporate dry ingredients.
Pour into tins and tap gently to remove large air bubbles.
Bake for 18 - 20 minutes.
Ginger Sponge
Use raw caster and add 2 tsp ground ginger and 1/2 tsp cinnamon
Chocolate Sponge
Replace 1/4 cup cornflour with 1/4 cup dark cocoa powder. Increase sugar amount to 2/3 cup.
Getting Organised - Menu Planning
Menu Planning is something I do in fits and starts. During very busy times like seeding and harvest, it's invaluable as I can plan meals that will either cook while I'm out in the paddock waiting, waiting or are quick and easy to prepare when I do get home.
Having a template makes it that much easier. Normally, I just use a note pad, but the page will be lost back in the pad as many other notes get written. I've developed a simple template that can be downloaded or printed from Google Docs:
Menu Plan
Lunch has been included as, often, in the quieter times, the men will come home for lunch. I still quite often will make a soup or wraps, depending on the season as I like to sit down for lunch with my daughter when she comes home during her lunch break.
Here's my plan for this week. I'm hoping to do a little shopping on the way home from Perth on Tuesday.
Monday 27th June
Normally, I'll just print it off and write my menu down so it can be changed. This time, I just used a handwriting font, found here: Angelina Font
Off to make custard for ice cream and ANZAC's. Enjoy your menu planning!
Friday, June 24, 2011
Getting Organised - Shopping
Recently, I helped out a friend in need and did a quick run around the supermarket for her. She handed me a Grocery Check List where she'd just ticked off all the items she required. It was so easy to use and on querying her about it, the list is a downloadable pdf from a blog. There's loads of these blogs out there, written by young mums, mostly, trying to get their lives into some sort of order and sharing their ideas with their avid readers.
The Grocery Check List was obviously from a US 'gal' and, while still really handy, didn't quite include the things that I would normally buy. I mean, where was the MightyMite? (I no longer buy Vegemite as it's not an Australian product anymore..)
So, I've developed my own check list. Since I buy very little pre-prepared stuff, it won't suit everyone, but I've left plenty of spaces to add your own items. (I didn't actually add MightyMite, but put in the item 'Spreads', and space to write the particular spread needed.)
I also make my own toiletries washing up liquid and cleaning products, so didn't include those either. Since I don't have babies, there's no nappies, baby food etc. either.
I don't usually buy eggs as I have a friend and a daughter with chooks and we swap eggs for soap.
If you'd like me to create one with these items, let me know what you need and I'll try to fit it in. Tell me what I can take out of the list that you don't normally buy.
I don't buy these items every week, of course, but it's still handy to have the whole list of things that I use.
This link will take you to Google Docs. You can then click 'File' and 'Download' or 'Print'. Let me know what you think, I'd love some feedback. I haven't made it all fancy with pretty pictures, that's just not my thing!
I'm sure there'll be something I've left off the list!
Grocery Check List
(modified 3/7/11)
Thursday, June 16, 2011
Creamy Cauliflower & Brie Soup
This particular soup came about when our outside fridge (beer fridge - but contains a lot of stuff that doesn't fit in the inside fridge) had a little fit and froze everything on the top shelf. A whole cauliflower was frozen solid.
What to do? Cauliflower Soup came to mind. I remember many years ago going to a restaurant where there was a Creamy Cauliflower Soup with Blue Cheese on the menu. So, I thought, "Why not?".
Unfortunately, I didn't have any Blue Cheese and there wasn't any at our local store. I would have liked to use a Blue Castello, a very light 'blue' cheese. Brie was available, so that's what I used.
Creamy Cauliflower & Brie Soup
1 onion
1 Tbsp olive oil
1 whole cauliflower
1 litre milk
2 tsp chicken stock powder
125g Creamy Brie (I use Australian Gold brand)
cracked black pepper
chopped chives, to garnish (wish I had some in the garden)
Saute diced onion in olive oil. Add milk, chopped cauliflower, stock and stock powder. Cook for 20 - 30 minutes. Put into a food processor or blender and puree. Add Brie and seasonings to taste and puree again.
Top with chopped chives to serve.
For Thermomix:
Chop onion on speed 5 for a few seconds. Scrape down and add oil. Saute on 100/speed 2/5 minutes. Add cauliflower, stock, milk and stock powder. Cook on 100/speed 2-3 20 - 30 minutes. Bring up to speed 7 slowly to puree for a few seconds. Add Brie and seasonings to taste, repeat.
Wednesday, June 8, 2011
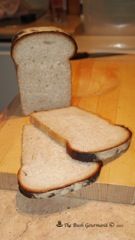
TangZhong Bread

TangZhong is the name of a starter that is used in the making of asian style soft sweet bread. I read about it on this blog and decided to try it out as the consistency of the cooked bread looked so soft and luscious.
I used the Thermomix to make the TangZhong, but you can use a saucepan easily enough. I reduced the sugar to make the loaf less sweet. It had a lovely texture and didn't have that 'yeasty' smell that home made loaves often get after a few days.
Tang Zhong Starter
250ml water
50g bread flour
Place in
Scrape out and place in a bowl on the bench (or fridge if you're in a hot area) to cool to room temperature.
Bread
500g bread flour (Wallaby)
160g TangZhong starter
200g water
2 tsp salt
30g sugar
2 tsp yeast
50g melted cooled butter (I just melt in the microwave)
I also added my 90g of mixed seeds
Place all in
Remove (flour hands so they don't stick to dough) and prove in a warm spot until doubled. Orr you can an allow the dough to prove in the TMX and then do next knead in the TMX as well)
Knead again by hand for a few minutes and then place in bread tin in a warm spot. Cover with a billowed plastic bag. It should rise above the tin.
Bake at 220C for 25 minutes. Remove from tin and bake a further 5 - 10 minutes. Cool on a rack.
Here's another picture of a much better loaf that I made with this starter after I realised that my yeast was out of date:
Tuesday, June 7, 2011
Apple & Fennel Pork Steaks

I bought some lovely pork steaks in Albany recently which were just too good to bash out to make schnitzels. So, I decided cook them as regular steaks and serve with a creamy apple & fennel sauce.
We all know that apple and pork have a wonderful affinity for each other, but not many people would think of fennel in this mix. I adore the aniseedy deliciousness of fennel seeds and normally will make a cabbage dish with fennel seeds and apple to serve with pork.
This time, a sauce was called for, so the apple and fennel seeds made a delicious debut. I didn't measure everything as I cooked, so amounts are estimates only. Use your own judgement and taste as you go!
Apple & Fennel Pork Steaks
8 pork steaks
1 Tbsp oil
pepper, salt
2 Tbsp butter
1 onion, sliced
1 green apple, sliced (place in a bowl of water with some lemon juice to prevent browning)
1 Tbsp brown sugar
2 tsp fennel seeds
1 cup chicken stock (or water with 2 tsp chicken stock powder)
2 Tbsp Balsamic vinegar
1/2 cup pouring cream (or skinny tinny if you're watching your fat intake)
1 Tbsp or so of cornflour
Heat oil in a large heavy based fry pan. Season pork steaks and cook on both sides for a few minutes on high heat until browned. Remove to a plate and cover with foil.
Heat butter in pan and add onion. Saute for a few minutes and add sliced apple and brown sugar, fennel seeds and balsamic. Saute until softened and caramelised.
Add chicken stock and cover with lid. Cook for 10 minutes or so until very soft. Test for seasoning.
Add cream mixed with cornflour and cook until thickened.
Return steaks and any juices to pan and reheat.
Serve with vegetables in season. I served with french beans, minted matchstick carrot and smashed potatoes.
Saturday, May 28, 2011
Megan's Perfect Pasties

These are the best pasties you'll ever taste!
I am so thrilled to have made these. I adore bakery pasties and recently had a horrible experience of (not) eating a truly awful pastie from the local bakery in town. The pastry was lovely, but the filling was a hard lump of something that tasted rather like cardboard.
For the pastry, make a batch of Rough Puff Pastry, using the method described here. Roll and turn about 6 times and then cut in half and refrigerate for half an hour or so.
If pushed for time, use ready rolled puff pastry. I prefer Pampas 25% Fat Reduced. It works a treat.
To make the filling:
250g lean beef mince
3 carrots
2 onions
1 turnip
½ to 1 parsnip
1 small potato
2 Tbsp rolled oats (soaks up liquid - thanks Judy!)
4 tsp beef stock powder
2 1/2 tsp ground black pepper
a few frozen peas
1 beaten egg for glazing.
I don't
bother peeling the root vegetables. Just chop roughly. Just make sure carrot is cut a little smaller than other vegies as it's harder.
Place mince, stock powder, peas and pepper into a large mixing bowl. Stir together.
To chop vegetables, place into food processor or Thermomix and chop on speed 5 for a couple of seconds at a time. Use the spatula to stir around and chop again if necessary. Add to mince with the remaining ingredients.
To make pasties:
Preheat oven to 200C. Line two trays with baking paper.
Roll out pastry and cut circles using a small side plate (I sometimes make smaller ones using my pie maker cutter). Brush inside with beaten egg and place filling on one half, avoiding edges. Fold other half over and seal with finger crimping. Prick with a fork and place on baking tray.
Brush with beaten egg and bake for half an hour.
Remove from tray and place straight onto oven racks and bake for a further 10 minutes. If using bought puff pastry, there's no need to do this. I just bake until they're cooked and remove to a cake rack to cool.

Filling the pastie

Ready for the egg glaze and baking
I used 3/4 of the pastry and made 10 pasties. The remaining pastry was made into 2 pastie sized apple turnovers, a croissant and some spirals with sugar on top.
Hints and Tips:
I now make snack sized pasties using the larger ring cutter from the electric pie maker - 12 cm diameter. I make 2 lots of pastry and cut into circles, laying each circle on a plate with baking paper in between (keep the baking paper in a plastic bag for next time).
If you make the filling a day or so before, place it in a colander over a bowl in the fridge. Just put a plate on top to stop it drying out. This will allow liquid to drain. Because there's salt in the mixture, it draws liquid from the meat and the vegetables.
My puff pastry making is now perfected and puffs up so much more than previously. Here's a photo of a recent batch.

Sunday, May 22, 2011
Rough Puff Pastry
It's been a while since I've posted here. Skinflint business has been busy and, although I've been doing a lot of cooking still, I haven't had time to blog about it!
Today I wanted to make sausage rolls to put in the men's lunch boxes for seeding. I had a little of the Pampas 25% Fat Reduced Puff Pastry in the freezer, but have had it in my mind to make some Puff Pastry, so that's just what I did.
I've been looking at a recipe on this site for Rough Puff Pastry and I thought that this was the way to go.
I honestly didn't think it would be that great, I'm not a good pastry maker. But, I was in for a pleasant surprise - it was wonderful! Certainly not difficult, maybe a little time consuming, but still not terribly hard to do.
I wanted to use my Thermomix as my hands are way too hot to try to rub in butter without it melting. The key to making great pastry is to have everything really cold. Checking the recipe in the EDC, it appears that you throw everything in to the Thermomix and use the dough setting.
So, that's just what I did (I put iceblocks in the water to chill it) and it turned out to be too much for the poor machine. So I tipped half of it out and just did it in two batches.
Edited some time later to add: I don't know that this makes much sense. Today I made this again and just made two lots, halving the recipe. I've reduced the water from the original recipe as 125ml of water is way too much. I also don't throw it all in at once anymore and have added lemon juice as it helps the pastry to puff.
So, this is the edited version:
Here's the method:
250g flour
250g cold butter, cut into chunks
110ml icy water
squeeze lemon juice
Weigh the flour and butter into the Thermomix bowl or food processor. Chop on speed 4 for around 5 seconds. Add the water and process on speed 4 until it comes together. If there is still a little ice, take speed up to 8 for a second. Tip on to well floured bench or silpat mat and press together, using the mat to bring the mass into a rectangle shape.

Roll pastry out to a long thick rectangle, about 10 x 20, short end facing you. Fold the top 1/3 down and the bottom 1/3 up to meet in the middle. Fold the bottom over the top. This is called a book fold. Wrap in plastic wrap and place in the fridge for 10 to 15 minutes, longer in summer. (Putting it in the freezer is even better)
Place dough onto floured mat. Roll out again to make the rectangle shape, but this time 20 x 30cm.

Roll out again, keep flour on your bench all the time. Try to keep the rectangle shape, push in the edges each time you do the book fold.

Repeat the above step three or four more times (refrigerating between to rest), constantly flouring the bench and the top of the pastry. Rest the pastry after the final roll for at least an hour, preferably overnight.
It should look like this with lots of layers.

When ready to cut shapes from pastry, roll out as evenly as possible, making it about 1mm thick, the same as ready rolled Puff Pastry.
Here's a few things I made with the pastry the very first time I made it. I've since perfected my pastry making and my pastry is a lot puffier these days.

Wow! Gobsmacked! Just like Puff Pastry!
On returning from the second trip to the farm, I cut the remainder of the piece into rectangles for Cream Matchsticks, my husband's favourite.

Again! Amazing Puff Pastry!
So, since I originally started this in order to make sausage rolls, I thought I'd better do so!
I squished out the filling from 1 packet of the wonderful butcher's sausages I buy from our local store into the Thermomix (a food processor would work). I then added 3 slices of bread, a large squirt of tomato sauce and some herbs from the garden - thyme, parsley and rosemary. Blitz for 30 seconds or so and use for sausage rolls.
I like to shape the filling and lay it on the pastry, so I wet my hands and take a large lump of sausage mine and roll it in my hands.


Bake sausage rolls at 200 for about 15 minutes.

Yum!
Here's my most recent pastry that was used for snack sized pasties:

Wednesday, April 6, 2011
Delicious Mayonnaise, Dijonnaise and Salad Dressings

There is absolutely no need to buy mayonnaise or salad dressings. Sure, the Thermomix makes mayonnaise making easy, but anyone can make it in a food processor too!
I make two sorts of mayo; one is a cooked one and the other a raw egg one. I only ever make the raw egg one when I have access to fresh farm eggs. I have a friend who regularly supplies me with happy chook's eggs and I exchange the kindness with soap. (Thanks Michaela) This time, I'll give her a jar of homemade mayonnaise.
Egg Mayonnaise
2 large whole eggs, separated
1 Tbsp of Dijon Mustard
2 Tbsp White Balsamic Vinegar (or plain white, or lemon juice)
2 tsp honey ( I use Jarrah)
salt & pepper (white) to taste
250ml sunflower oil
Place yolks, salt and pepper, honey, mustard and vinegar in processor or Thermomix bowl. Mix on speed 4 for 30 seconds or so.
Scrape down.
With blades rotating on speed 4, MC in place, slowly pour oil onto lid of Thermomix. If using a food processor, slowly pour oil through spout while processor is working.
Add oil steadily over a period of about 5 minutes.
Once thickened, taste test for seasoning etc. and add egg whites, mixing for 10 seconds on speed 4.
Add 1/4 tsp of Vitamin C powder to help preserve, if desired. Store in jars in the refrigerator.
I make double this recipe. I like to make a variety of dressings with this one mayonnaise.
1. Add yoghurt and chopped mint to make a potato salad dressing.
2. Add lemon juice for a Waldorf salad dressing.
3. Add wholegrain mustard and Special Salad Dressing for Dijonnaise.
4. Add anchovies for a Caeser salad dressing.
5. Add some mayonnaise to a creamy chicken casserole sauce for that tangy zing.
The possibilities are endless.
My cooked mayonnaise recipe can be found here. This is a sweeter mayonnaise and can be used in the following ways:
1. For tasty Tartare Sauce - add chopped capers and gherkins
2. Coleslaw Dressing - add some of the juice from canned pineapple. Add the chopped pineapple to the coleslaw.
3. Use as a potato salad dressing as is.
4. Mix with Special Salad Dressing, 2 tsp curry powder, 1 tsp dry mustard powder to make a Curried Pasta Salad Dressing.
Special Salad Dressing
This is a dressing I've developed over the years. It's similar to my Lemon & Mustard Dressing, with a few tweaks.
1/2 cup lemon juice & lemon zest
1/4 cup white vinegar
3/4 cup sunflower oil
3 tsp Jarrah honey (to taste)
2 tsp dulse flakes
2 tsp seeded mustard
1/2 tsp lemon herb seasoning
1/4 tsp onion powder
1 tsp lecithin
1/4 tsp turmeric
salt & white pepper
Blend together and place in a jar or bottle. The turmeric is optional, but I like the yellow colour. The dulse flakes are a dried sea vegetable and add both flavour and nutrition, but are low in sodium.
I throw this dressing into a whole variety of dishes to add flavour and tanginess.
Thursday, March 31, 2011
Vanilla Processor Cake

This is a cake recipe that I've come up with based on a number of different recipes. I make it in the Thermomix, but it can be made in a food processor or even a normal mixer.
It will make one large cake suitable for a small baking dish, 2 smaller cakes or around 24 large patty cakes.
If no buttermilk is available, sour some milk by warming gently in the microwave and adding lemon juice. The acidic liquid is required to activate the bi-carb soda.
I add lecithin to my mixture, but it's not absolutely necessary. It just stops it looking curdled and makes for a smoother cake.
Lecithin is available from pharmacies and health food stores. It's made from soya beans and is an emulsifier.
Vanilla Cake
260g raw sugar
170g Dairy Soft
4 eggs, room temperature
300g plain flour
40g custard powder
2 tp baking powder
1 tsp bi-carb soda
1 cup buttermilk or soured milk
2 tsp vanilla
1 tsp lecithin (optional)
Blitz sugar to make into castor sugar.
Add butter blend and mix at speed 4 for 30 seconds.
Add eggs one at a time, beating at speed 4 and adding 3 Tbsp of flour mixture with the last egg to prevent curdling.
Add milk and flours and blend at speed 2 up to 4 until incorporated. Blend until smooth.
Bake at 160C for 1 hour in a small baking dish, 25 - 30 minutes on 200C for large patty cakes, 40 minutes at 180C for two smaller round cakes.
Vanilla Frosting
100g softened butter
200g icing sugar
1 Tbsp Custard Powder
2 - 3 Tbsp cream or milk
2 tsp vanilla
2 Tbsp glucose (optional)
Blend butter, sugar and custard powder on speed 3 until smooth.
Add cream, essence and glucose. Continue blending until smooth and creamy.
Thursday, March 17, 2011
The Challenge Continued...

While the one month long Pantry and Freezer Challenge has officially finished, I'm still vowing to use up everything in my freezers.
I have one chest freezer which is nearly empty, an upright freezer with a mainly frozen fruit for sorbets etc, and two fridge freezers.
Luckily, one fridge freezer has some nice porterhouse steak from the local store which has only been there since January. So, no freezer burn!!
Steak, potato gratin and salad for tea tonight! And, of course, pepper sauce.
My Pepper Sauce is made with a secret gravy mix that I buy which is delicious. Use any gravy mix and add a good glug of sherry, about 1/2 a cup of cream (or skinny tinny if you're watching) and some crushed mixed peppercorns to taste. Cook as normal. If you have any beef stock in the fridge or freezer add some of that for a more intense flavour.
Tuesday, March 8, 2011
The Challenge Tuesday Week 4
Today begins the final week of my Pantry & Freezer Challenge. All my freezers are beginning to look a bit bare, especially the chest freezer.
Yesterday, I made chicken stock with the carcass of the chicken cooked earlier in the week. I added a miripoix (diced carrot, celery and onion) and bouquet garni and cooked it on low for about 3 hours.
Last night's tea was a delicious concoction of Creamy Chicken with Vegies and Pasta.
I had three bone in chicken thighs and three people to feed. This actually fed three of us and made two meals to freeze.
Creamy Chicken with Vegetables and Pasta
3 bone in chicken thighs or a couple of marylands
1/2 cup chicken stock
1/2 cup white wine
2 cups of vegetables - I had carrots, red and green capsicum, snow peas, mushrooms and zucchini
1/2 cup cream
30g butter
salt & pepper
extra stock
Cornflour to thicken
Cooked pasta - about 2 cups
Poach chicken in stock and wine until well cooked. Allow to cool and then remove meat and dice. Place cooking liquid in freezer to set fat.
Saute harder vegetables in butter. Add cream and other vegetable and cook for a couple of minutes. Add extra stock and seasonings.
Add pasta, chicken and skimmed stock/wine from freezer and cook until vegetables are to your liking. Thicken with cornflour if necessary.
Sorry, no photo as camera not working. Lucky, darling son gave me his top notch camera for my birthday!
Tonight's tea is Curried Sausages. With only one packet of sausages (Lake Grace Butcher ones - the best!) and the whole family to feed tonight, I have to make them go a long way.
Dessert is Lemon Meringue Tarts. The reason I'm splashing out with dessert is because I have a jar of home made lemon butter in my pantry. Also, I made Hollandaise to have with my poached egg yesterday morning and had some left over egg whites.
Only thing is, when I opened the jar, it didn't taste the best and I realised it was a year old.... Pastry tarts already cooking in the oven, so I had to make another batch of Lemon Butter! Now I have even more egg whites! Meringues coming up, I think!
Here's the Lemon Butter recipe converted from a CWA one for the Thermomix:
Lemon Butter
500g sugar
250g butter
Juice of 4 lemons and zested rind of 3
Cook the above for 6 minutes/90/speed 3 to dissolve sugar and make a syrup.
Reduce heat to 80.
4 eggs - 2 with the whites, and 2 with yolks only
Beat the eggs and add slowly to the Thermomix bowl while on speed 3. Continue cooking for about 10 minutes until the mixture looks like honey and coats the back of a spoon.
Refrigerate in jars.
Sunday, March 6, 2011
The Challenge - the rest of Week 3!
Time has got away from me this week, so I'm condensing the menu for this week into one post.
I'm finding that "The Challenge" is really about using up what's in my freezer. My pantry is full, yes, but I use everything and constantly replace items as they are finished or low in stock.
I buy a lot of things in bulk - all my flours, sugar, rices, nuts and seeds. I have loads of spices because I love to cook curries.
The rest of this week's cooking:
Roast Chicken - cooked in the Turbo Oven outside because it's too hot to cook inside!
Banana Muffins - My own recipe can be found here

Cinnamon Scrolls - making these right now, so will post photo when they're done. (can't find the camera, so no photo! They are superb! Recipe to be found here, adapted by forum guru JulieO.
Creamy Tomato Salmon Pasta - The salmon had been in the freezer a while and tasted rather 'fishy'. It obviously doesn't have a long freezer life due to it's oil content. (still working on this recipe, so will post when I'm satisfied with it)
Other than that it's been left overs this week. Not terribly adventurous, I know, but the limited meat ingredients in my freezer is leaving me with very little motivation. Freezer burned chicken legs, dubious packets of stuff that could be dog meat & sausages.
I do have some special things in there - a whole duck, a duck breast and some duck stock, but want to save these for a special occasion. Also, a whole fillet steak which will be saved for when the whole family is here for tea.
Tea tonight is crumbed steak, cauliflower gratin, baked potatoes, carrots, beans and peas.
I've had my first disaster. Defrosted a bag of what looked like dog mince and threw it into the Thermomix with some diced carrot and pumpkin to cook for Rambo's tea and find out that it's sausage mince. Can't give it to Rambo and can't use it now as it's cooked!!!
Total Spend now around $235.00.
The Challenge - Tuesday Week 3
Well, week 3 already and I'm starting to delve deeper and deeper into my freezer! I did a sneaky swap with my daughter - her lamb for my pork.
I found a wonderful Chicken Gallantine in the freezer that I'd made some time ago.
Tonight's tea was Madras Lamb Curry:
1 tsp turmeric
750g boneless leg lamb (can use shoulder, but cook longer)
Cut lamb into 2.5cm cubes and massage turmeric in.
2 tsp fennel seeds
2 tsp ground cinnamon
2 tsp ground cardamom
Roast in Thermomix for 5 minutes/Varoma/Speed 2.
Remove
2 tsp coriander seed
1/2 tsp dried chilli flakes (more if you like it hotter)
1 tsp cumin seeds
Roast for 5 minutes/Varoma/Speed 2.
Add:
1 tsp fenugreek seeds
Grind on speed 6 for a few seconds. Place paper towel between lid and bowl.
Add:
5 roughly chopped garlic cloves
2.5cm piece ginger, roughly chopped
2 Tbsp oil or ghee
Blend to a smooth paste on speed 7, scraping bowl down every few seconds.
Cook for 5 to 10 minutes/Speed 3 until fragrant.
Add:
Lamb
250ml coconut milk (reserve rest of 375ml can)
Cook on Varoma/Speed spoon/Reverse/10 minutes.
Add remaining coconut milk and reserved spices. Season with salt to tast.
Cook on 90/Speed spoon/Reverse/60 minutes.
Add:
2 Tbsp lime juice or tamarind to taste
Check for seasoning and tenderness. Can continue cooking if necessary.
Serve with basmati rice and Vegetable Korma (from the Every Day Cooking Book)
Subscribe to:
Posts (Atom)